Rise & shine

Just as there are support groups for people who fear flying, there should be some help for cooks who live in terror of bread making.
“My name is Sarah H.,” a participant might say. “And I’m afraid of yeast.”
Sure, to the uninitiated, something mysterious and scary happens when that oh-so-simple combination of flour, water and yeast begins taking on a life of its own.
But, really, expert bakers say, homemade bread shouldn’t send you into a cold sweat.
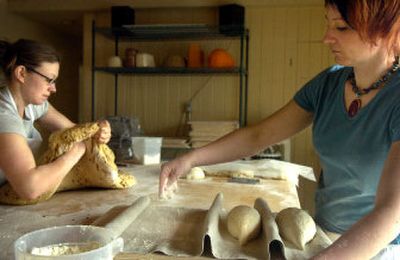
“There’s no need to be afraid of it,” says Dena Carr, head bread maker at Spokane’s Bouzies Bakery. “It takes a lot of time. But it’s not fussy.”
In fact, Carr, the mother of three, first started baking bread when her children were small. It was a hobby that demanded many hours, but only brief bursts of attention — perfect when chasing after kids, she says.
Since December, Carr has been making artisan loaves for Bouzies Bakery, which is owned by the couple behind Luna and Cafe Marron. The bakery produces about 300 loaves of Luna bread, ciabatta, walnut levain, honey wheat and several other varieties each day.
With bread, as with most anything in life, you get out of it what you put into it. There’s a direct correlation between the quality of the loaf and the amount of time invested in it. And that’s what sets artisan breads apart from simple yeast breads or mass-marketed loaves.
“The longer bread rises, the better the flavor,” says Char Zyskowski, of Spokane’s Apple Charlotte Cooking Co. “An artisan loaf is a built loaf; that’s how I look at it. It doesn’t take one day, it takes several days.”
Like laying the foundation for a house, an artisan bread begins with a mixture known as a “preferment.” A preferment is what gives sourdough its characteristic tang and what lends that chewy, toothsome texture to rustic loaves.
Preferments can be quite loose or stiff. Some are made simply from a piece of old dough (such as “pate fermentee”). Others are separate mixtures of flour, water and yeast (called “biga” or “poolish”).
And then there are sourdough and “levain” starters, which can be kept alive for years and years on end. These preferments are made from naturally occurring yeasts and not commercial ones. That means that a sourdough starter created in San Francisco will have a slightly different characteristics than one whipped up in Coeur d’Alene – part of the magic of cooking with a living ingredient.
“Our starter is unique to the Inland Northwest,” says Tom Tuffin, a bread maker who co-owns Spokane’s Arabesque Farms and Bakery with his wife, Louise. “It’s a function of nature.”
Tuffin’s breads start with a biga derived from natural yeasts found in flowers, grains and wild elderberries.
At Bouzies, Carr makes the majority of the breads using levain.
“Levain extends the shelf life, easily, four or five days,” she says.
And Zyskowski uses a starter grown from the yeast found on grapes.
No matter what they contain, preferment mixtures are allowed to sit for a matter of hours or days before being incorporated into the dough.
“It’s creative, but it’s scientific,” says Steve Caudill, an artisan bread baker from Kettle Falls, Wash.
Caudill, a maintenance man at a Colville motel by day, got into bread making about eight years ago. He started baking a few simple loaves of whole wheat and is now a member of the Bread Bakers’ Guild of America and has attended several courses at the prestigious San Francisco Baking Institute.
“It’s just a hobby I got into,” he says. “Some people make quilts or stained glass or furniture.”
Caudill now teaches classes in artisan bread making. He doesn’t sell his bread commercially, but offers plenty of loaves to friends and co-workers.
He has taught himself how to calculate recipes by weight instead of volume, and has worked out formulas for various types of breads.
“It’s fun to play around with the formulas,” he says. “You can play with the numbers all day long.”
Once the dough has risen and been shaped, it’s time to bake it. There are a few secrets to getting a bakery-quality loaf from your home oven.
Creating steam in the oven will help develop a crispy crust. This can be done in a number of ways. Some bakers put a pan of water in oven as it’s heating and then add another cup of water before putting in the loaves. (But Zyskowski cautions that’s an easy way to wind up getting burned.) Instead, she favors misting the oven several times with water during the first few minutes of baking.
Placing a pizza stone on the bottom rack of the oven as it’s preheating will create a thick crust once the loaves are baked on it.
Bear in mind, though, that these fresh-baked artisan loaves do not have the shelf-life of preservative-packed commercial bread. They are best eaten in a day or so and can be kept, cut side down, on a cutting board covered with a clean kitchen towel. For longer storage, it’s best to slice it, wrap it and stash it in the freezer.
Whatever you do, though, don’t treat your homemade loaves like Wonder Bread, Carr says.
“The death of bread is to wrap it in plastic,” she says.
If the thought of baking bread from scratch is still intimidating, keep in mind the end results:
The perfume of fresh-baked bread wafting through your house.
A toasty, hot loaf waiting on your counter, begging for a pat of butter or a wedge of cheese.
The oohs and aahs from appreciative family and friends.
Carr says there shouldn’t be anything holding back aspiring bread makers:
“Get a book and find something that looks good and dive in.”
Pane Pugliese
This crusty, slightly domed and delicious peasant bread is made with a very slack (wet) dough. The dough is almost impossible to work with, but produces a pleasingly open texture. A long fermentation enhances the bread’s flavor.
For the biga:
1/2 cup (4 ounces) water
1 1/4 cups (5 1/8 ounces) unbleached all-purpose flour
1/8 teaspoon instant yeast (see note)
For the dough:
All of the biga (above)
1 1/2 cups (12 ounces) water
4 cups (17 ounces) unbleached all-purpose flour
2 teaspoons salt
1 teaspoon instant yeast
In a small mixing bowl, combine the water, flour and yeast to form a soft dough. Don’t knead it; just make sure all of the ingredients are well-incorporated. Set this mixture aside in a warm place, covered, for 12 to 16 hours.
Knead all of the dough ingredients together, using a mixer or bread machine (this is well nigh impossible to knead by hand), until the dough is cohesive and elastic (though not necessarily smooth), about 10 minutes. Cover the dough and let it rise in a warm place for 2 to 3 hours, gently stirring it down each hour. (The longer you let the dough rise at this point, the better the flavor of the finished loaf will be).
Lightly grease a half-sheet pan or other flat pan. Scoop the very wet dough, in two separate pieces, onto the pan lengthwise, shaping each piece into a rough oval as best you can. Cover the dough with heavily greased plastic wrap, and allow it to rise for about 90 minutes. It’ll spread quite a bit; don’t worry, it’s supposed to. Spray the loaves heavily with warm water, and bake them in a preheated 450-degree oven for 25 to 30 minutes, or until they’re a deep, golden brown. Turn the oven off, prop the door open, transfer the loaves from the pan to the oven rack, and allow them to cool in the turned-off oven.
Note: Instant dry yeast, unlike active dry yeast, does not have to be “proofed” or soaked in water. Rapid-rise, quick-rise or bread machine yeast can be substituted for instant yeast but expert bakers caution that those types of instant yeast don’t allow the bread to develop the best texture and flavor.
Yield: 2 loaves
Approximate nutrition per serving (1 slice or about 1/10 of a loaf): 108 calories, less than 1 gram fat (9 percent fat calories), 3 grams protein, 23 grams carbohydrate, 1 gram dietary fiber, 215 milligrams sodium.
Asiago Ciabatta
From www.kingarthurflour.comFor the biga:
1 1/2 cups unbleached all-purpose flour
1/4 cup pumpernickel, rye, or whole wheat flour
1 cup water
1/8 teaspoon instant yeast (see note)
For the dough:
2 1/2 cups unbleached all-purpose flour
1/2 cup water
1 1/2 teaspoons salt
1/2 teaspoon instant yeast
4 to 5 ounces Asiago or Parmesan cheese, cut into 1/4-inch dice (about 1 cup), plus extra for grating over the top of the bread
Mix all of the biga ingredients in a medium-sized bowl until well-blended. Cover the bowl, and leave it at cool room temperature (68-70 degrees Fahrenheit) for 12 to 20 hours, until the biga is very bubbly.
To make the dough: Mix the biga and the remaining dough ingredients, except the cheese, using an electric mixer set on slow speed, for 2 to 4 minutes. Increase the speed to medium and mix for about 4 minutes; the dough should be soft and slightly sticky. Add additional water or flour if necessary. Mix in the cheese; don’t worry if some pieces pop out. Allow the dough to rise, in a greased, covered bowl, for 1 to 2 hours, until it’s very puffy.
You can also mix this dough in a bread machine set on the dough cycle; add the diced cheese several minutes before the end of the final kneading cycle.
Turn the dough out onto a well-floured surface, and shape it into two long loaves, about 12-by-4-inches each. Place the loaves, floured side up, onto parchment paper (if you plan to bake on an oven stone) or baking sheets. Cover the loaves with well-greased plastic wrap, and allow them to rise for 45 minutes, or until they’re very puffy. Sprinkle them with additional grated cheese.
Bake the ciabatta in a preheated 450 degree oven for 22 to 26 minutes, until it’s golden brown. Remove it from the oven, and cool on a rack.
Note: Instant dry yeast, unlike active dry yeast, does not have to be “proofed” or soaked in water. Rapid-rise, quick-rise or bread machine yeast can be substituted for instant yeast but expert bakers caution that those types of instant yeast don’t allow the bread to develop the best texture and flavor.
Yield: 2 loaves
Approximate nutrition per serving (based on 10 per loaf): 123 calorie, 2 grams fat (1.3 grams saturated, 17 percent fat calories), 4.8 grams protein, 20 grams carbohydrate, 6.5 milligrams cholesterol, less than 1 gram dietary fiber, 193 milligrams sodium.
California Sourdough Whole-Wheat Bread
From “Bernard Clayton’s New Complete Book of Breads”
For the sponge:
2 cups hot water (120 degrees-130 degrees)
2 packages dry yeast
1/3 cup nonfat dry milk
3 cups whole-wheat flour, stone-ground preferred
1 cup whole or cracked wheat grains
For the dough:
1/4 cup dark molasses
1 tablespoon salt
3 tablespoons vegetable shortening
2 1/2 to 3 cups bread or all-purpose flour, approximately
Start the sponge 3 days before baking. In a large bowl, blend together hot water, yeast, dry milk and whole-wheat flour.
Cover bowl tightly with plastic wrap so the moisture won’t evaporate. Leave at room temperature for 3 days. Once each day, stir the mixture briefly. The sponge will rise then fall during this period – but it continues to ferment.
One hour before making dough, soak grains in hot water to cover. Drain, press dry through a sieve and stir into the sponge.
To make the dough, stir into the sponge the molasses, salt and shortening. Stir in the white flour with a wooden spoon at first, then use your hands. Knead by hand for 10 minutes until dough becomes soft and pliable.
Place dough in mixing bowl and pat with buttered or greased fingers. Cover with plastic wrap and leave at room temperature until doubled, about 2 hours.
Punch down the dough. Knead for 30 seconds to press out bubbles. Divide dough in half with sharp knife, shape into balls and let rest under a towel for 5 minutes.
Shape by pressing each ball under your palms into a flat oval, roughly the length of the 8-by-4-inch baking pan. Fold the oval in half, pinch the seam tightly to seal, tuck under the ends, and place in the pan, seam down.
Cover the pans with wax or parchment and leave until the center of the dough has risen even with the edge of the pan, about 1 1/4 hours.
Preheat oven to 375 degrees about 20 minutes before baking.
With a sharp razor, slash each loaf down the center; them make several small diagonal cuts, as branches from a limb.
Bake until deep brown and crusty, 40 to 50 minutes. Take a loaf out of the pan, tap the bottom. A hard, hollow sound means the bread is baked.
Remove from pans and cool on wire racks.
Yield: 2 medium loaves
Approximate nutrition per serving (based on 10 per loaf): 183 calories, 2.5 grams fat (.5 grams saturated, 12 percent fat calories), 6.8 grams protein, 35 grams carbohydrate, no cholesterol, 3.5 grams dietary fiber, 145 milligrams sodium.