Making homemade chocolate bunnies

On Valentine’s Day, lovers create handmade cards and write poetry. For Halloween, some parents forgo store-bought costumes for ones made with love on the sewing machine. Christmas offers endless opportunities for self-expression.
So, for Easter, why not fill the baskets of loved ones with homemade chocolate bunnies?
Even a novice can make professional-looking treats, and, by using uniquely flavored chocolate, family members can enjoy a bunny that fits their taste buds – whether they like their chocolate with a hint of lavender, huckleberry or even cayenne pepper.
“If there’s someone on your list who loves (a particular flavor), you can make a very personalized gift for them,” says Susan Davis, owner of the Chocolate Apothecary.
Chocolate bunnies first appeared as symbols of Easter in medieval Europe, according to various sources on the Internet. The hare was associated with spring for centuries because of the animal’s enthusiastic mating practices during that time of year – a time for new life and rebirth after the cold winter.
According to Pagan tradition, Eostre, the goddess of fertility, once transformed a bird into a hare, perhaps explaining why so many cultures accepted a story about a hare that could lay eggs. Eggs themselves are another old symbol of life and fertility.
German lore taught that the Easter Hare would lay beautifully colored eggs for good children to find – either out in nature or in a bonnet or hat left out on Easter’s eve.
It seems that bunnies of the chocolate variety are just as fertile as their mammal counterparts. More than 90 million were sold in the United States each year, and the holiday runs neck and neck with Halloween as the second most candy-consuming holiday behind Christmas, according to the National Confectioners Association.
To make a basic chocolate bunny, all you need is chocolate and a metal or plastic mold. The higher quality chocolate, the better, Davis says.
“High cocoa butter content will give you the proper snap” when you break off a piece of the bunny, she says.
Resist the urge to use a bag of chocolate chips from the grocery store. Not only are they made with poorer quality chocolate than gourmet bars, they’re designed to hold their pointy shape, so they don’t melt and take on a new shape well, Davis says.
If you’re not picky about the taste of the chocolate and perhaps your main goal in making the bunnies is to have fun with your children, pick up a bag of “compound coating” chocolates, advises Eva Roberts, owner of Just American Desserts. These morsels resemble flattened chocolate chips, are easy to work with and are available at candy supply and craft stores.
For the gourmet, though, there are countless top-quality chocolate bars with unusual flavorings that can be melted and molded into bunnies. Among the Chocolate Apothecary’s offerings are coffee-, praline-, rosemary- and ginger-infused bars.
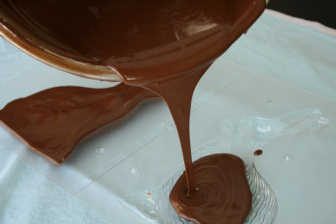
The first step is to melt the chocolate and local candy experts advise different ways for doing so.
Roberts recommends chopping up the chocolate bars and placing half the amount you’ll need in glass container. Zap the chocolate in the microwave at 15-second intervals until it melts, then add the remainder of the chocolate pieces and stir until the heat from the first half of the batch melts the rest.
Diana Gonzales, co-owner of Carolyn’s Cake Decorating and Candy Supplies, suggests customers use a double boiler instead of the microwave.
Either way, both candy experts say the most important thing is to avoid getting any water in the chocolate.
“If you get one drop of water in that melted chocolate it will seize and turn into a mess,” Roberts says.
To get the right consistency, professional candy makers follow a tempering process when melting chocolate. They raise it to a particular temperature, then drop it back down again. Doing so ensures that the fat in the chocolate doesn’t “bloom” or separate, creating a white, chalky substance on the finished product.
Davis says, “That’s the biggest challenge in making your own molded chocolates. You don’t want them to look funky.”
For amateurs to avoid blooming, Gonzales recommends adding what are called Paramount Crystals to the melting chocolate. These white flakes are made from partially hydrogenated oil and they thin out the melted chocolate so it’s easy to use.
Once the chocolate has a smooth consistency, here are the basic directions for finishing your bunny: Place the mold on a baking sheet, pour the melted chocolate into it, then freeze it for three to 20 minutes, depending on the size of your project. The chocolate should pop out of the mold easily with a gentle tap when it’s ready.
But this is where amateur chocolatiers can tinker with the outcomes:
“For a solid bunny, fill the entire cavity with chocolate.
“For three-dimensional solid bunnies, use a mold with an opposing side. Fill both halves, making sure the chocolate is level, and carefully insert the baking sheet into the freezer ensuring that it sits flat as it hardens. Just before the chocolate fully sets, remove the chocolate from the mold and press the two flat sides together. Use more melted chocolate to “glue” the seam with a small brush.
“For a hollow three-dimensional bunny, coat the mold with a layer of melted chocolate then use the same “gluing” technique to join the front and back.
“To create a bunny with a filling, coat the mold with a layer of chocolate, freeze it, then pour melted caramel, ganache, peanut butter or some other gooey treat into the cavity. Freeze it again, then cover it with a final layer of chocolate and freeze for a third time.
“Many molds have small details, such as grass or flowers, surrounding the bunny. You can highlight those features by painting them with melted chocolate of a different color than the chocolate you’re using for the main body. For example, Carolyn’s Cakes sells green compound coatings that can be used for grass. Paint the melted green chocolate onto the desired part of the mold, freeze it, then fill the rest of the mold with the main chocolate choice and freeze it again.
If you’re making chocolate bunnies with children, take extra care when handling the melted chocolate. Rather than pouring it straight from a hot pot into a mold, consider pouring the chocolate into squeeze bottles first. Things could get messy and the bottles will still be warm (you might need to wrap dishtowels around them to protect little hands), but the extra effort could prevent children from burning themselves.
Making chocolate bunnies is difficult to do wrong. But if something goes astray and your chocolate bunny looks more like a piece of putty than Peter Cottontail, there’s a way to fix it.
“You can always remelt it and use it again,” Roberts says.