Follow these suggestions for carving your holiday bird
For some people, carving the Thanksgiving turkey is a tradition and point of pride. There’s never any question whether they will do the honors when that golden centerpiece emerges from the oven.
But when the carving knife must change hands, it can leave even the best host or hostess feeling overwhelmed.
Chef Douglas Fisher, an instructor from the Spokane Community College’s Inland Northwest Culinary Academy, was among the volunteers slicing the smoked birds last week at the Women’s and Children’s Free Restaurant to prepare for the annual dinner for low-income families.
The restaurant served Thanksgiving dinner Saturday at two locations to about 1,500 people. Underwriting from Pawn 1, wholesale turkeys from Eggers Meats – which donated the smoking – and an army of volunteers made the dinner possible.
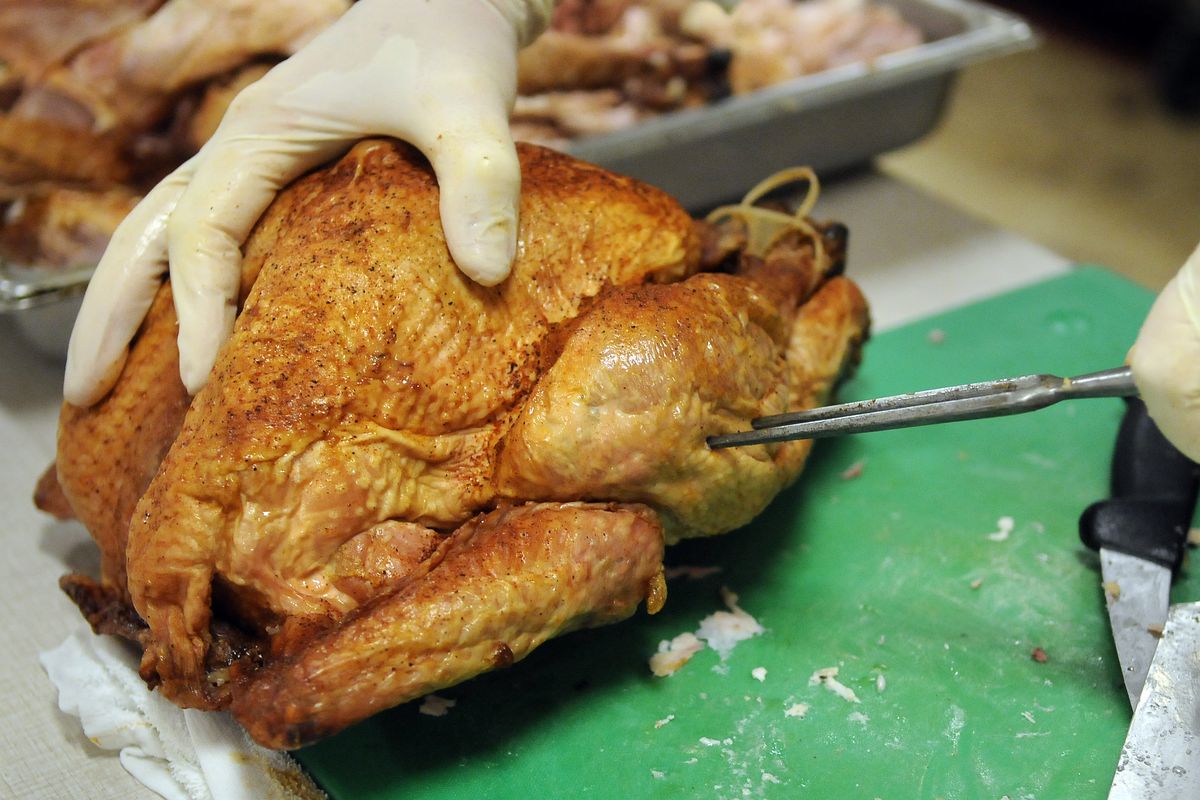
Fisher kindly took a few minutes from his station to demonstrate carving techniques and give a few tips for slicing the bird.
We also turned to two recently released cookbooks for additional advice, including “Knives Cooks Love: Selection, Care, Techniques, Recipes,” by Sara Jay (Andrew McMeel Publishing, 2010) and “Zwilling J.A. Henckels Complete Book of Knife Skills,” by Jeffrey Elliot and James P. DeWan (Robert Rose Inc., 2010).
But before you even hoist the carving knife, there are three essential things every carver must know: how to test the turkey for doneness, when to begin carving and the importance of a sharp knife.
Is it done?
Fisher says it’s best to ignore any pop-up timers embedded in the breast of your turkey. By the time the breast meat is hot enough to inspire that built-in thermometer to surrender, you might as well serve sawdust to your guests.
Instead, use an oven-proof thermometer or an instant-read thermometer to test the meat for doneness. The United States Food Safety and Inspection Service recommends 165 degrees as the minimum internal temperature for turkey. Test the thickest part of the breast and the innermost section of the thigh.
To be sure the thermometer is accurate test it by putting the probe into ice water. The thermometer should read 32 degrees Fahrenheit.
Fisher also says a good way to test turkey for doneness is to use a carving fork to poke the bird in a few strategic joints to see if the juices are running clear. Poke the turkey where the leg meets the thigh and where the wing attaches to the bird.
It can be tricky to get the breast and thigh meats both perfectly cooked, inspiring cooks, chefs and scientists to come up with a host of tricks over the years. Some recommend roasting the bird upside down for part of the time, shielding the breast meat with thick aluminum foil or even icing the bird’s breast before putting it into the oven.
Let it rest
Thanksgiving cooks won’t be resting much, but it’s essential that the bird does. After the turkey is pulled from the oven, tent it with foil and let it sit for 30 minutes, Fisher says. This allows the juices to redistribute into the meat before carving begins and will mean tastier meat for guests.
Sharpen up
A sharp chef’s knife or carving knife is essential for this job. It is not only safer, but it will make the job a whole lot easier.
Time to carve
Once the turkey has rested and the stuffing has been removed, place the bird on a grooved cutting board to catch any juices. Or, place the cutting board inside a rimmed baking sheet. Keep the board from sliding around by putting a damp towel or paper towel under it.
• Remove the legs: Use a carving fork to stabilize the turkey and cut through the skin between the leg and the body, cutting close to the leg. Put the knife down and pull the entire leg down and away from the turkey. Use a clean, dry towel if the turkey is too hot. Slice straight through the joint to remove the leg.
Lay the leg on the cutting board, skin side up, and cut between the drumstick and thigh to separate them. If you’re carving the drumsticks, hold each one vertically by the end of the bone and slice straight down along the bone, rotating the drumstick until all the meat is removed. Repeat with the second drumstick. (Or, leave them whole for Grandpa.)
• Bone the thighs: Many people like to use the same technique for slicing the thigh, but Fisher recommends boning the thigh before slicing it across the grain.
To do it, lay the thigh down on the cutting board and steady it with the carving fork. Cut along both sides of the bone, then turn the knife so it is parallel to the board and slip it underneath the bone, slicing it from one end to the other to remove it. Then turn the thigh over and cut into slices across the grain of the meat.
“It will give the impression that the meat is more tender,” Fisher says.
• Carve the breast meat: There are two ways to tackle this part: at the table or in the kitchen.
Whichever method you choose, Fisher likes to start by loosening the breast from the carcass. He starts at the wishbone and then uses the tip of his knife to cut along one side of the breast bone. He also cuts along the wishbone.
For those who carve the turkey at the Thanksgiving table, hold the knife parallel to the board and angle it slightly to follow the rib cage. Start with a thin slice on the outermost edge of the breast and then continue to cut thin slices of meat until the breast is removed. Repeat on the other side.
Another way to carve the white meat is to remove the entire breast and then slice the meat on the cutting board. After cutting along the breastbone, gently pull the meat away from the bone and use the knife to cut along the rib cage to separate the entire breast. Cut along the bottom of the breast to release it from the carcass.
Set the breast on the cutting board and slice it across the grain (and slightly diagonally if you like) into servings.
• Remove the wings: Wings help stabilize the bird for carving, so remove them last. Cut into the joint where the wing meets the backbone to remove it. Cut off the wing tip before placing it on the serving platter.
I forgot to mention the important quality-control taste-testing duties of the person who carves the Thanksgiving turkey, but that will come naturally.
Here are two recipes for roast turkey. The first is a top-rated recipe from the Los Angeles Times’ test kitchen. The second is Alton Brown’s recipe for brined turkey, which was rated high by more than 2,500 people.
Dry-Brined Turkey
This recipe, also known as the “Judy Bird,” was inspired by a chicken-cooking technique of Judy Rodgers, the chef and owner of San Francisco’s Zuni Café. Tasters who tried the turkey cooked in the Los Angeles Times test kitchen loved the result and readers did, too.
L.A. Times food editor Russ Parson says more than 200 readers sent notes about the recipe when it first ran, some saying it was the best turkey they’d ever roasted. There are more details about why the dry-brining recipe works on the newspaper website at www.latimes.com. The story, “The absolutely best Thanksgiving turkey recipe. Ever,” ran on Nov. 10, 2010.
Parson writes, “This is more a technique than a recipe. It makes a bird that has concentrated turkey flavor and fine, firm flesh and that is delicious as it is. But you can add other flavors as you wish. Minced rosemary would be a nice finishing addition. Or brush the bird lightly with butter before roasting.”
1 (12- to 16-pound) turkey
Kosher salt
Wash the turkey inside and out, pat it dry and weigh it. Measure 1 tablespoon of salt into a bowl for every 5 pounds the turkey weighs (for a 15-pound turkey, you’d have 3 tablespoons).
Sprinkle the inside of the turkey lightly with salt. Place the turkey on its back and salt the breasts, concentrating the salt in the center, where the meat is thickest. You’ll probably use a little more than a tablespoon. It should look liberally seasoned, but not over-salted.
Turn the turkey on one side and sprinkle the entire side with salt, concentrating on the thigh. You should use a little less than a tablespoon. Flip the turkey over and do the same with the opposite side.
Place the turkey in a 2 1/2-gallon sealable plastic bag, press out the air and seal tightly. Place the turkey breast-side up in the refrigerator. Chill for 3 days, turning it onto its breast for the last day.
Remove the turkey from the bag. There should be no salt visible on the surface and the skin should be moist but not wet. Place the turkey breast-side up on a plate and refrigerate uncovered for at least 8 hours.
On the day it is to be cooked, remove the turkey from the refrigerator and leave it at room temperature at least 1 hour. Preheat the oven to 425 degrees.
Place the turkey breast-side down on a roasting rack in a roasting pan; put it in the oven. After 30 minutes, remove the pan from the oven and carefully turn the turkey over so the breast is facing up (it’s easiest to do this by hand, using kitchen towels or oven mitts).
Reduce the oven temperature to 325 degrees, return the turkey to the oven and roast until a thermometer inserted in the deepest part of the thigh, but not touching the bone, reads 165 degrees, about 2 3/4 hours total roasting.
Remove the turkey from the oven, transfer it to a warm platter or carving board; tent loosely with foil. Let stand at least 30 minutes to let the juices redistribute through the meat. Carve and serve.
Yield: 11 to 15 servings
Approximate nutrition per serving: 564 calories, 26 grams fat (8 grams saturated), 77 grams protein, no carbohydrate, 261 milligrams cholesterol, no dietary fiber, 856 milligrams sodium.
Good Eats Roast Turkey
Courtesy chef Alton Brown, www.foodnetwork.com.
1 (14- to 16-pound) frozen young turkey
For the brine:
1 gallon vegetable stock
1 cup kosher salt
1/2 cup light brown sugar
1 tablespoon black peppercorns
1 1/2 teaspoons allspice berries
1 1/2 teaspoons chopped candied ginger
1 gallon heavily iced water
For the aromatics:
1 red apple, sliced
1/2 onion, sliced
1 cinnamon stick
1 cup water
4 sprigs rosemary
6 leaves sage
Canola oil
Starting 2 to 3 days before roasting, begin thawing the turkey in the refrigerator or in a cooler kept at 38 degrees.
Combine the vegetable stock, salt, brown sugar, peppercorns, allspice berries, and candied ginger in a large stockpot over medium-high heat. Stir occasionally to dissolve solids and bring to a boil. Then remove the brine from the heat, cool to room temperature, and refrigerate.
Early on the day or the night before you’d like to eat:
Combine the brine, water and ice in the 5-gallon bucket. Place the thawed turkey (with innards removed) breast side down in brine. If necessary, weigh down the bird to ensure it is fully immersed, cover, and refrigerate or set in cool area for 8 to 16 hours, turning the bird once half way through brining.
Preheat the oven to 500 degrees. Remove the bird from brine and rinse inside and out with cold water. Discard the brine.
Place the bird on roasting rack inside a half-sheet pan and pat dry with paper towels.
Combine the apple, onion, cinnamon stick and 1 cup of water in a microwave-safe dish and microwave on high for 5 minutes. Add steeped aromatics to the turkey’s cavity along with the rosemary and sage. Tuck the wings underneath the bird and coat the skin liberally with canola oil.
Roast the turkey on lowest level of the oven at 500 degrees for 30 minutes. Insert a probe thermometer into thickest part of the breast and reduce the oven temperature to 350 degrees. Set the thermometer alarm (if available) to 161 degrees. A 14-to 16-pound turkey should require a total of 2 to 2 1/2 hours of roasting.
Let the turkey rest, loosely covered with foil or a large mixing bowl, for at least 15 minutes before carving.