Dorothy Dean presents: witch fingers and meringue ghosts
Alright. I’m getting excited. My absolute favorite holiday is almost here.
Halloween is like Christmas to me. I decorate the house, inside and out. I watch all my favorite scary movies. I create elaborate costumes for my family.
And I bake.
Baking Halloween treats, for me, is a lot different than baking for any other occasion. Baking for Halloween is the perfect time to let your freak flag fly. Get gory. Get creative. Think outside the coffin.
Cakes shaped like skulls. Eyeball truffles. Berry sauces for blood. Rice Krispies treats for brains. Meringue ghosts. And one of my favorites: witch finger cookies.
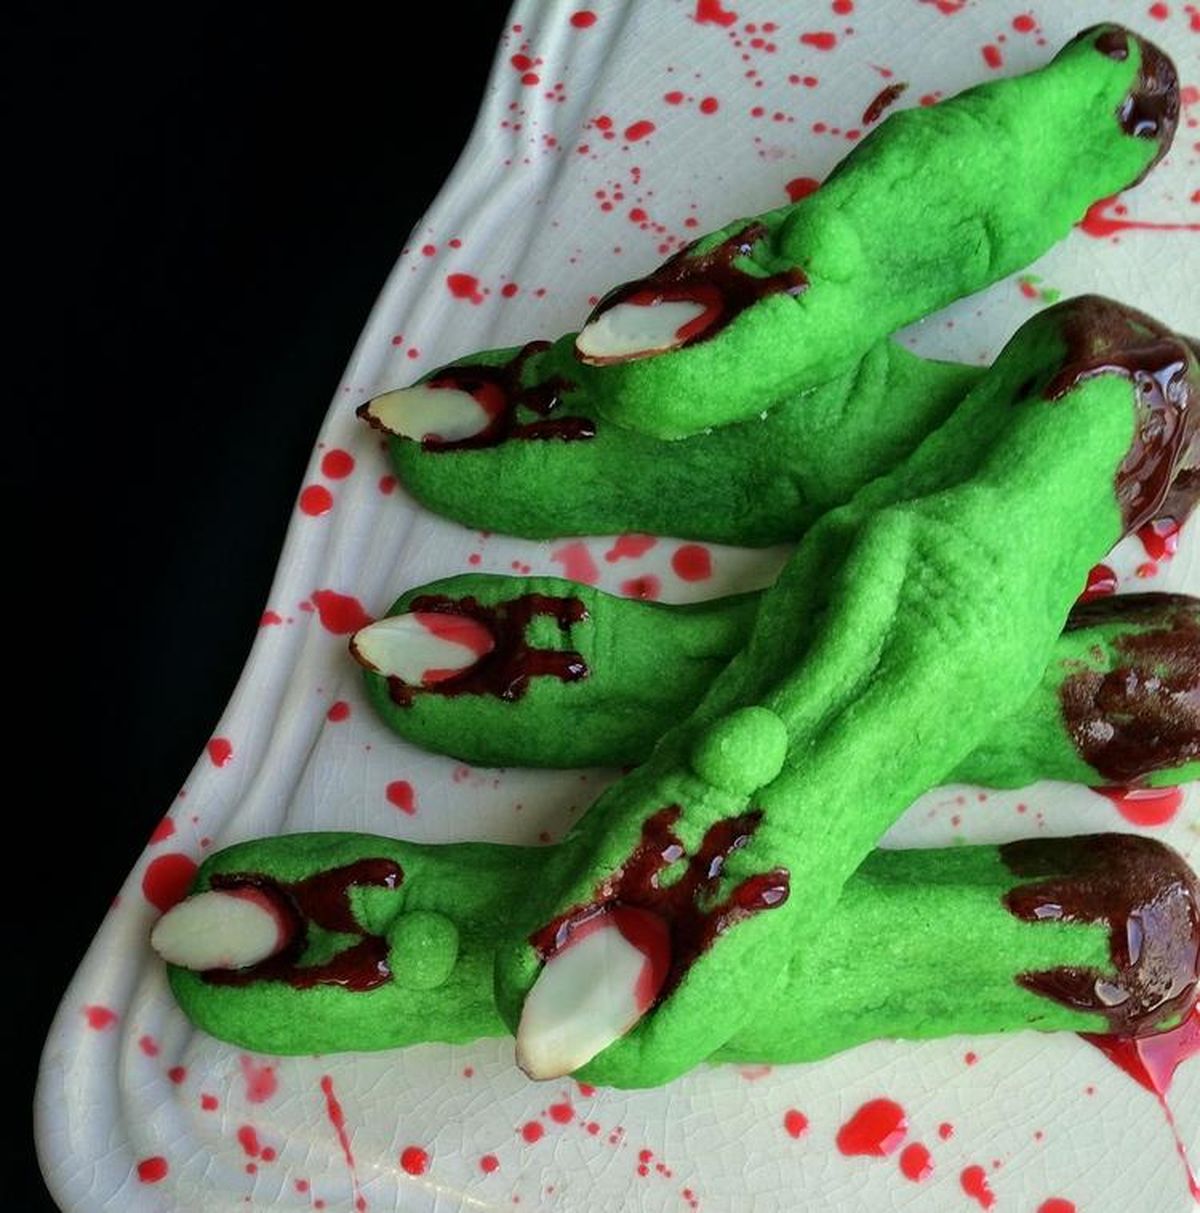
These spooktacular cookies are made from a buttery shortbread that has a hint of almond flavor. They hold their sculpted finger shape well, warts and all. And they’re jaw-dropping in appearance with their bright green color and oozing red (food gel) blood. These cookies will shock the scariest of ghouls and leave them wanting more. They’re finger-lickin’ good.
And these little meringue ghosts are festive and easy. I make them every year for our costume party. And just like ghosts do, they literally disappear. They’re sweet and delicate, with a slight bite. And they melt in your mouth.
If you’ve never made meringue, let this be your gateway to goodness. You want to be sure that your bowl, whisk and spatula are squeaky clean. Any traces of fat or grease will prevent your egg whites from getting stiff. And I would avoid using plastic bowls for these, as they tend to harbor grease.
Having your eggs at room temperature also helps ensure volume, as warmer whites whip up faster than cold. And when separating your eggs, try not to get a drop of yolk into the whites, as the fat interferes with the whites expanding.
When piping out these sweet little spooks, you can layer tiers or even do a swirl. Just keep them under 2 1/2 inches tall, otherwise they tend to fall over. If you don’t have a pastry bag and tips, a large zip-top baggie with the corner snipped off works fine.
And they will all come out looking a bit different. This is a good thing, as it gives each of your ghosts its own personality – which can really shine through once you start decorating them with their eyes and mouths.
Besides being delicious on their own, these also make great toppers for cakes and cupcakes. However you choose to serve them, ghosts should always be at the top of your guest list for Halloween celebrations.
Meringue Ghosts
4 large egg whites
1/2 teaspoon cream of tartar
1 cup sugar
1/2 teaspoon pure vanilla extract
Black icing gel
Place oven rack in the center of the oven and preheat to 200 degrees. Have a baking sheet with a silicone mat or lined with parchment paper. Fit a pastry bag with a 1/2-inch plain tip.
Add egg whites to the bowl of electric mixer and beat with the whisk attachment on low speed until foamy. Once foamy, add the cream of tartar and continue beating until whites hold soft peaks. Slowly add the sugar, a little at a time, and beat until stiff peaks form. Add in vanilla extract and beat until incorporated.
Put the meringue mixture into piping bag. To pipe out ghosts, steadily press the meringue directly down onto baking sheet, and lift up to make layered stacks for each ghost (releasing pressure just a bit, while pulling up your frosting bag at the same time between layers).
Bake for 1 to 1 1/2 hours or until they are dry and crisp to the touch. Turn oven off and prop open the oven door. Leave meringues to finish drying in oven several hours, or even overnight.
When completely dry, use black icing gel on the tip of a toothpick to draw on eyes and mouth. Store in airtight container.
Witch Finger Cookies
1 cup butter, softened
1 cup powdered sugar
1 egg
1 teaspoon almond extract
1 teaspoon vanilla extract
2 2/3 cups all-purpose flour
1 teaspoon baking powder
1 teaspoon salt
Green food coloring gel
3/4 cup whole almonds or almond slivers
1 tube red decorating gel
Combine the butter, sugar, egg, almond extract, and vanilla extract in a mixing bowl. Beat together with an electric mixer; gradually add the flour, baking powder and salt, continually beating. Once dough has come together, mix in green food gel until desired color is reached; refrigerate 20 to 30 minutes.
Preheat oven to 325 degrees. Lightly grease baking sheets.
Remove dough from refrigerator in small amounts. On a lightly floured work surface, roll each piece into a finger shape about 4-4 1/2 inches long. Pinch each piece of dough in two places to create knuckle shapes. Use the back of a small paring knife to lightly score the surface of the knuckles. Add warts by rolling a tiny piece of dough into a ball and attach to finger with a bit of water. Press almond into tip for fingernail. Arrange the shaped fingers on the baking sheets.
Bake until fingers are slightly golden around edges, 18 to 22 minutes. Squeeze a small amount of red decorating gel around nail and at base of finger so it appears to be oozing blood.