Bridge

When on a blind guess as to which opponent to play for a critical card, you should finesse into the hand of the opponent you like more — nobody likes to lose a finesse to a hated opponent who will gloatingly produce the killing card.
However, sometimes there are more-pressing technical reasons for your decision. For example, you may be able to recover if you wrongly place one opponent with length but not if you take the opposing view, as on today’s deal.
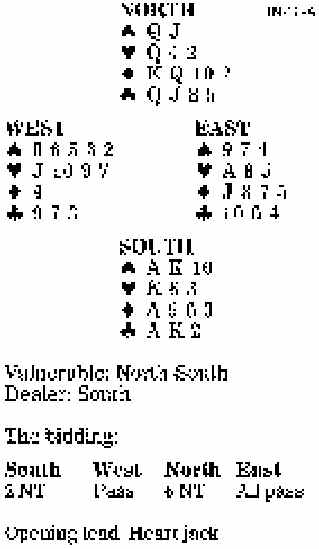
West led the heart jack against six no-trump, and dummy played low, as did East. After winning the heart king, declarer saw that he had 11 tricks, with a 12th available in diamonds. The first thing South had to do was to cash his seven black-suit winners, throwing a heart from table and hand, while each defender also discarded a heart.
At this point the guess in diamonds appeared critical, but on the assumption that West had not underled the heart ace, the contract was now assured. Declarer cashed the diamond king and ace, knowing that if the suit split, he would have 12 tricks. If West had turned up with four diamonds, the diamond jack would have been finessible. But as it was, when East proved to hold the long diamonds, he was known to have reduced to the bare heart ace in the three-card ending. So he was thrown in with that card and forced to return a diamond into dummy’s Q-10 to concede the contract.
Bid with the aces
South holds:
| •8 6 5 3 2 | |
| •J 10 9 7 | |
| •4 | |
| •9 7 3 |
| South | West | North | East |
| 1 • | Dbl. | Pass | |
| 1 • | 2 • | Dbl. | Pass |
| ? |
Answer: Bid two hearts. Your partner’s second double is not for penalties — it shows a hand with extras beyond what his first takeout double showed. You may have a miserable hand, but you do have two suits that you can show economically. So bid your second suit and hope that partner will let you off the hook soon.