12 Days of Crafting, Day 8: Santa Lucia crowns for kids
Back in September, my husband and I hosted a couple from Sweden in our home as they traveled through our area.
I’ve long been a fan of all things Scandinavian (hello?! Ikea!), but I feel even more connected to that corner of the world after spending a week with Bruno and Iris.
They inspired today’s craft: a Santa Lucia crown.
Santa Lucia is an Italian saint who helped Christians in hiding during the 4
th
Century. As the story goes, Lucia carried candles on her head to be able to hold as many supplies as she could in her hands for the Christians.
In Sweden, it’s traditional to hold a procession on Dec. 13 of girls wearing white dresses and singing Christmas carols. The lead girl or oldest daughter in a family wears an evergreen wreath with burning candles on her head to honor Lucia.
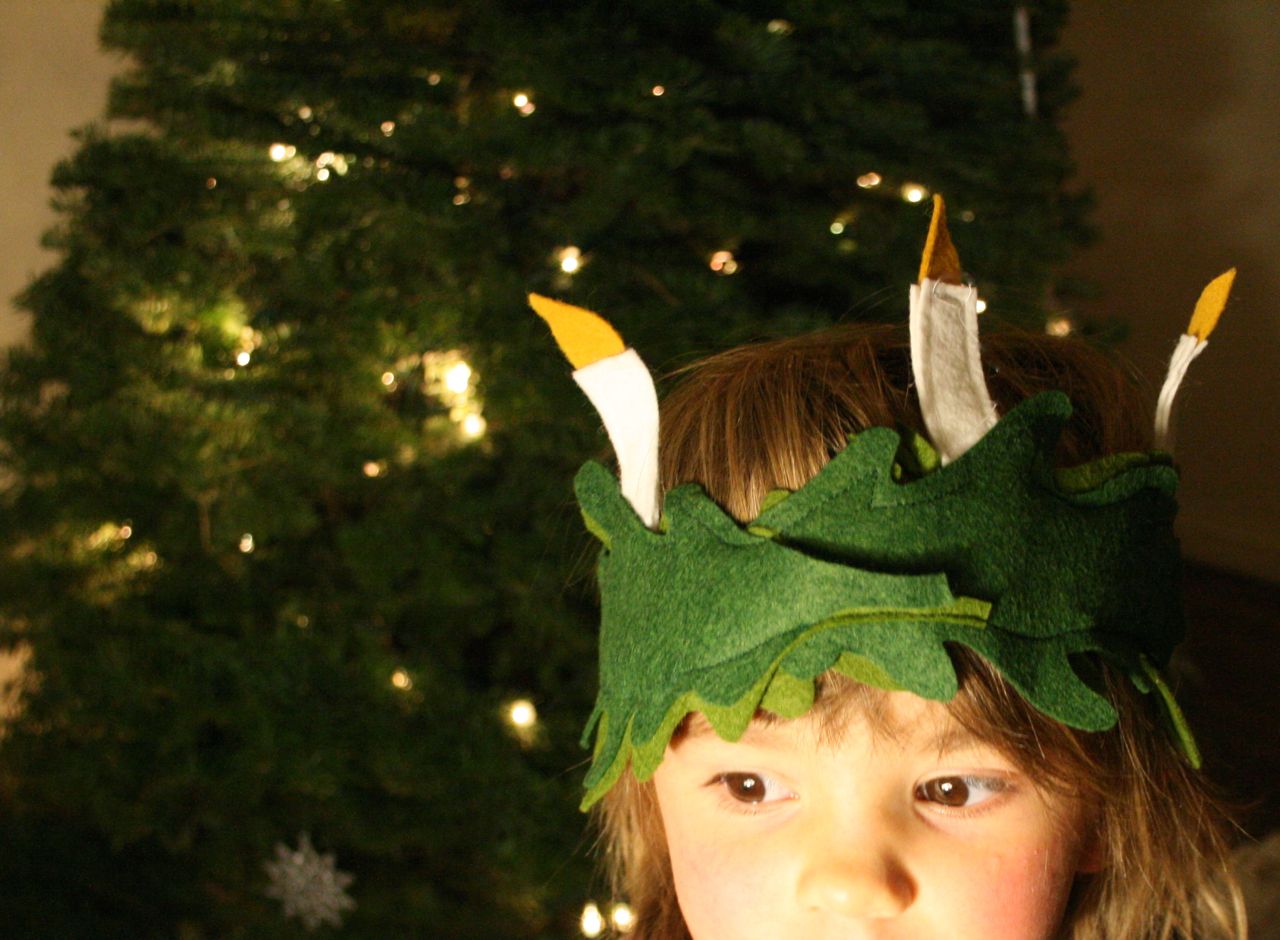
Beautiful, right? But my oldest daughter is 4, so there’s not way I’m putting a hat o’ flame on her head.
My solution is this Santa Lucia crown made from felt.
The instructions below are for sewing a crown, but if that’s not your thing just follow these basic steps using construction paper and glue.
And here’s
a photo slideshow of the steps
if you’re a visual learner.
Green felt, preferably in two different shades and preferably made from wool
White felt
Yellow felt
About 4 inches of 3/4-inch wide elastic band
A leaf template, such as a drawing you print and cut or a cookie cutter
An ink pen (either a Sharpie or a water-soluble fabric pen)
Scissors
Basic sewing supplies
1. Measure the circumference of your child’s head. You’re going to make enough leaves to wrap around the head twice, minus 2 inches.
2. Trace and cut out about 10 leaves, although the number of leaves will depend on the size of the leaf you’re using and the circumference of your kid’s head. If you’re using a Sharpie pen, cut inside the lines so the ink doesn’t show when you’re done.
3. Cut 8 “candles” from the white felt (about 3 inches by 3/4 inch), and cut 4 yellow flames.
4. Pin the leaves together so that they overlap and so that they stretch out over 20 inches or whatever the circumference of your child’s head is (minus 2 inches).
5. Hold two candles back to back and pin them in between two layers of leaves. Repeat until you’ve inserted four candles in between the leaf layers.
You’re using two candles at a time to help them stand up straight. Applying fusible interfacing would work, too.
Space the candles out evenly along the top of the wreath. Pin the yellow flames inside the two layers of candle.
6. Sew all the layers together starting at one end of the leaves and basically outlining them, the candles and flames with thread—EXCEPT AT THE TWO ENDS, WHERE THE CROWN WILL MEET IN BACK OF THE CHILD’S HEAD. Leave two layers of leaves open on each end so you have a place to insert the elastic.
7. Slip the elastic inside both of those open ends. Place the crown on your child’s head and adjust the length of the elastic so that the crown fits snuggly. Pin it in place.
8. Sew across the open leaf ends with the elastic in place inside, backstitching and going forward again a few times so the elastic is secure.
9. Jump on your Malm bed and bang your Skanka pots and pans to celebrate making a Santa Lucia crown. (Yes, I realize there is more to Sweden than Ikea, but I love it so.)
* This story was originally published as a post from the marketing blog "DwellWellNW." Read all stories from this blog