Covered cork board tutorial
Remember the trash-to-treasure demo I did at the Everybody’s Bazaar a few weeks ago? Well, today I finally have tutorial No. 2 ready for you.
As a reminder, I was given $25 on Day 1 of the Everybody’s Bazaar indoor garage sale and told to buy items I could repurpose in creative ways on Day 2. The first project was an apron I sewed using an old quilt top.
Tutorial No. 2 is a fabric-covered cork board you can use to post grocery lists, pictures or anything else you want to display.
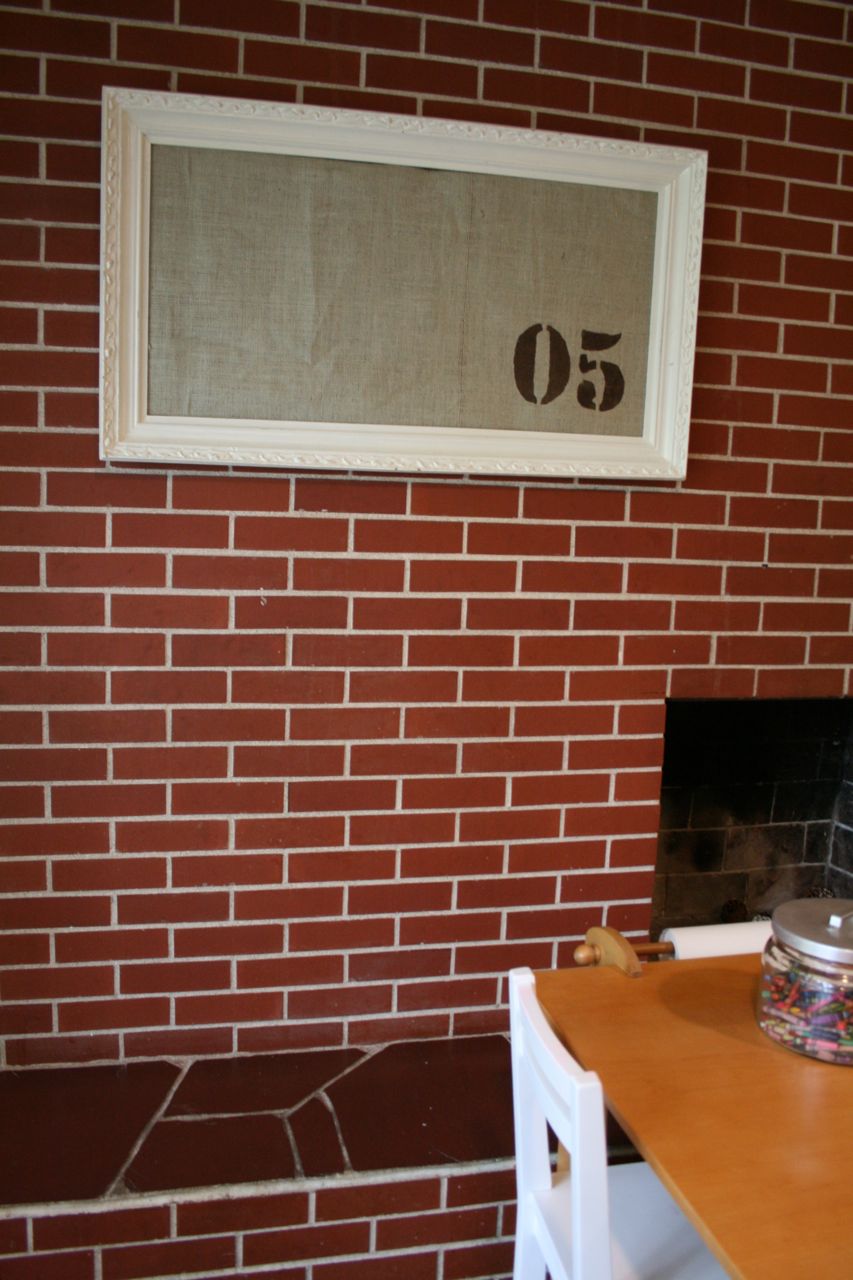
The “trash” I started with for this project was the $8 white picture frame you see here . I had an old cork board wasting space in my basement storage room, so I decided to give it new life inside the frame.
Inspired by the aesthetic of the Barn House (one of the vendors at the Farm Chicks Antique Show last June) and Junebug Furniture & Design (which recently held the Mad Hatter Vintage Flea Market) I chose to cover the cork board with burlap that I stenciled with the number 5.
Why 5? Well, we have a few 5s floating around our house to represent the members of our family: me, my husband, our two daughters and our sweet, deceased dog who will always be part of our family.
You could stencil anything on the fabric, though, like a bunny or a bicycle or a tree. Whatever.
And you could use a more cheerful fabric, too, like these . Yum!
I’m going to write out the steps here, but you can also watch the slide show for the full tutorial, whichever is easier for you to follow. I’d love to hear from anyone who makes their own cork board following these directions—or any directions. Heck, I’d love to see any crafts you make so I can show them off here on Dwell Well.
Covered Cork Board Tutorial:
Supplies—
an empty picture frame
cork board cut to fit in picture frame opening
fabric that’s as big as the cork board plus a couple of inches around each side
paint
sponge brush
freezer paper (available in most grocery stores near the tin foil and plastic wrap)
pencil
iron and ironing board
scissors
a hot-glue gun and glue-gun sticks
a saw or large X-acto knife to cut the cork board to the size you need
Step 1: Print off your computer an image you’d like to stencil, such as numbers, letters or a silhouette of an animal. Tear off a piece of freezer paper that’s as big as the image, plus a couple of inches around all sides. Place the freezer paper on top of the printed image, waxy side down, and trace the image onto the freezer paper.
Step 2: Cut out the inside of the traced image on the freezer paper, leaving plenty of paper surrounding it.
Step 3: Repeat the cutting step for all the images you want to transfer to the fabric.
Step 4: Place the freezer paper stencils you’ve created on the fabric where you want them to go. Make sure the waxy side is touching the fabric. Using a warm iron, iron the freezer paper’s smooth side until the waxy side adheres to the fabric. It only takes a few seconds.
Step 5: Place some sort of padding, like newspaper, under your fabric so the paint doesn’t bleed through.
Step 6: Using a sponge brush, dab the paint into the opening of the stencil. Don’t brush side to side, which might cause paint to creep under the outer edges of the stencil. Work in an up-and-down motion.
Step 7: Keep dabbing on the paint until the area is covered. Don’t worry about painting over the edges of the freezer paper. Allow the paint to dry.
Step 8: Once the paint has dried, carefully peel off the freezer paper. Ta dah! There’s your image, crisp and clear.
Step 9: Wrap the fabric around the cork board and staple it to the back side.
Step 10: Pipe a ribbon of hot glue into the lip of a picture frame, then place the fabric-cover cork board into place.
Step 11: Once the glue has dried, hang the framed cork board somewhere that’s easily accessible.
Step 12: Use push pins to attach pictures, grocery lists and other items to the cork board.
* This story was originally published as a post from the marketing blog "DwellWellNW." Read all stories from this blog