Replacing damaged bathroom tiles

Q: The previous owner of our house redid the tile in the upstairs bathroom himself, and it isn’t the best job. Several of the ceramic floor tiles along the base of the bathtub are loose, cracked or broken. What’s the fastest way to fix this? — Chuck B., Quincy, Mass.
A: Check first for water damage in the underlayment beneath the tiles. Apparently, the tiling job wasn’t top-notch, because the effect of constant weight (of the tub), improperly applied caulk and water spilling down the sides of the tub have caused the tiles to loosen and the seal along the tub base to weaken.
Minimal water damage can cause the plywood underlayment to swell, making it difficult or even impossible to place new tiles evenly. Long-term water damage can spark other issues, like wood rot or mold.
•Remove all the loose tiles from the floor and pry up broken and cracked tiles around the perimeter of the area.
•If necessary, scrape away old grout from the underlayment to get a better view of the damage. Look for dark water spots, sniff for mold (or visually identify it) and run your fingers along the plywood to feel for uneven areas. Press down with your fingers or the tip of a screwdriver to see if the wood feels spongy or gives way easily. If the wood is damaged or wet, it will need to be replaced before tiling can be done.
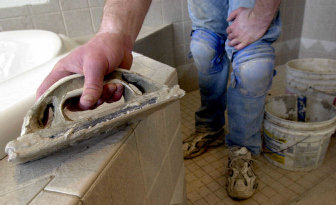
•Once the underlying floor has been deemed healthy, the bathroom tiles can be replaced. Remove old grout and waterproof caulking from the edge of the bathtub base and clean debris from the repair area. For a small repair job, tiles can be arranged prior to installation so you can match them with the existing tile pattern and cut tiles to size if necessary.
•To install, start from the base of the tub and work outward to the rest of the bathroom tile. Apply adhesive to the bottom of each tile, set into place, and place spacers between the new tile, the old tile and the tub base (spacers will keep the tiles far enough apart to allow grout to fill in properly).
•Once complete, apply grout liberally to the spaces, scraping away excess. Be sure to apply grout between the tiles and the bathtub base, too. Let the grout dry completely, and then apply new waterproof caulk along the bathtub base and the newly installed tile.Wipe away any grout residue or film with a damp cloth.
HOME TIP: If you need to remove a damaged ceramic tile in sections, use a glasscutter to score the tile with an “X” and tap the center of the tile with a cold chisel. Within a few gentle taps, the tile will break neatly into four pieces.