Bridge

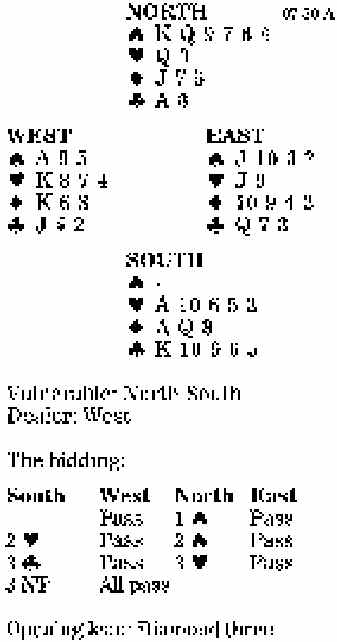
As West, defending three no-trump, you lead the diamond three to the five, nine, and queen (which, incidentally, marks declarer with the diamond eight or 10). Declarer now plays a heart to dummy’s queen, a heart to his ace, and a third heart, partner having turned up with the jack-nine doubleton. You win cheaply and switch to a club. Declarer wins with dummy’s ace and plays a second club to his 10 and your jack, as your partner follows upwards in clubs, suggesting a three-card suit. What now?
This has really turned into a double-dummy problem. Declarer is known to have five hearts to the ace, three diamonds to the ace-queen, and apparently five clubs also.
It looks as if declarer has made his contract, since he is threatening to take three hearts, two diamonds and four clubs, and all you can see on defense is a spade winner, two hearts and one club trick. Indeed, if you return a club, for example, South will win, concede a heart to you, and claim nine tricks. However, look at the effect of cashing your spade ace. What can declarer discard? If he throws a diamond, you can exit with a diamond and have the king to cash when you get in with the heart king. If he does not throw a diamond, he must throw a winner instead. You simply exit with a club, having first cashed the heart king and sit back to wait for the diamond king as your side’s fifth trick.
Bid with the aces
South holds:
| “A 8 5 | |
| “K 8 7 4 | |
| “K 6 3 | |
| “J 4 2 |
| South | West | North | East |
| 1 “ | |||
| Pass | Pass | 2 “ | Pass |
| ? |
Answer: Bid two spades, a cue-bid that shows club support and asks partner to describe his hand. Here you would like to find a heart fit if partner can introduce the suit, or to play no-trump if partner has something there. Otherwise, you are likely to stop in three clubs.