Bridge
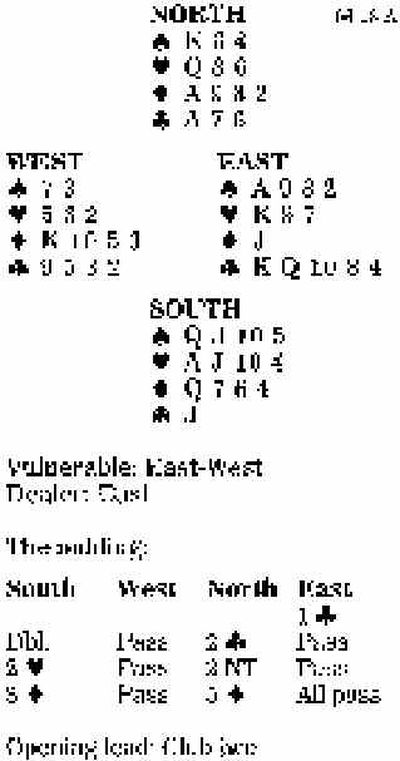

In five diamonds, declarer won West’s club lead in dummy to tackle trumps at once. There were potential dangers associated with playing ace and another, so it seemed more prudent to start with a low diamond to the queen. In the event, the first diamond went to East’s jack, declarer’s queen and West’s king.
West naturally continued with a second club. South ruffed in hand and played a spade to West’s seven, dummy’s king and East’s ace. (East would have done better to duck this, but it was not easy for him to see why at the time.)
East now continued with a third club, which declarer ruffed in hand. It seemed quite likely to South that trumps were originally 4-1, but if that were the case, he could not pick up the suit by normal means. Nonetheless, South guessed well to play a diamond to dummy’s eight, and East did indeed show out. Declarer followed with the heart queen to the king and ace. He next cashed the spade queen, West contributing the three. South decided to take the echo in spades at face value and switched his attention to hearts. He cashed the jack and 10, both opponents following, and then played the fourth heart. There was nothing West could do. If he ruffed, declarer would overruff, draw the last trump, and cash a spade. If he pitched a club, South would discard the spade from dummy and lead out spades from hand, and West would again be caught in a trump-coup.
Bid with the aces
South holds:
| •A 9 8 2 | |
| •K 9 7 | |
| •J | |
| •K Q 10 8 4 |
| South | West | North | East |
| 1 • | Pass | 1 • | Pass |
| 1 • | Pass | 3 • | Pass |
| ? |
Answer: Pass. Your partner’s sequence shows an invitational hand with a good six-card suit. If he had more, he would have temporized with the fourth suit to set up a game-forcing auction. Accordingly, because you have an ill-fitting minimum, you have no reason to go looking for game.