Bridge

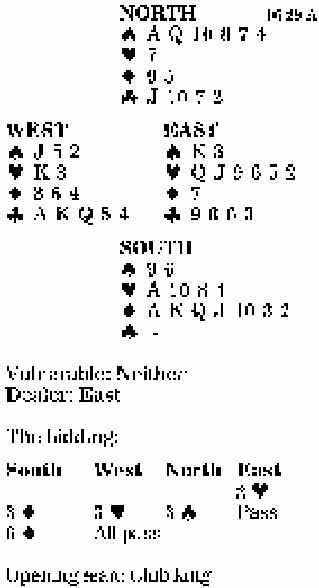
On today’s deal, after East opened with a pre-emptive two-heart bid, South overcalled three diamonds. When North volunteered three spades over West’s three-heart call, South now had a legitimate problem. His solution was a swashbuckling leap to six diamonds. As you will see, the contract had real prospects, but declarer was foiled by East’s fine defense.
West led a top club, ruffed by South, who continued with the spade nine, which ran to East’s king. That player now found the only return to defeat the contract — the second spade. This effectively cut declarer off from dummy’s established spades. The best South could do was to win in dummy, play the diamond nine to remove East’s singleton trump, then cash a spade for a heart discard. He then ruffed a club to hand, cashed the heart ace, and ruffed a heart in dummy, bringing the total to 11 tricks. But then his choice was to play another spade and run into a defensive ruff or to ruff a club back to hand to run the trumps, in which case there would be a heart loser at the end of the day.
See what happens on a different return by East at trick three — say a diamond or a heart. Declarer can win in hand, draw all the trumps, then lead a spade to dummy’s 10, after which all the losing hearts are discarded on the spades. Indeed, this line of play would even cope with a 4-1 spade break (West having started with jack-fourth).
Bid with the aces
South holds:
| •J 5 2 | |
| •K 3 | |
| •8 6 4 | |
| •A K Q 5 4 |
| South | West | North | East |
| 1 • | Pass | 1 • | Pass |
| ? |
Answer: Rebid one no-trump. With this pattern one might consider a raise to two spades, particularly with the diamond suit open like this. However, you need better spades to raise – particularly when, as here, you can envisage a source of tricks in a side suit.