Bridge
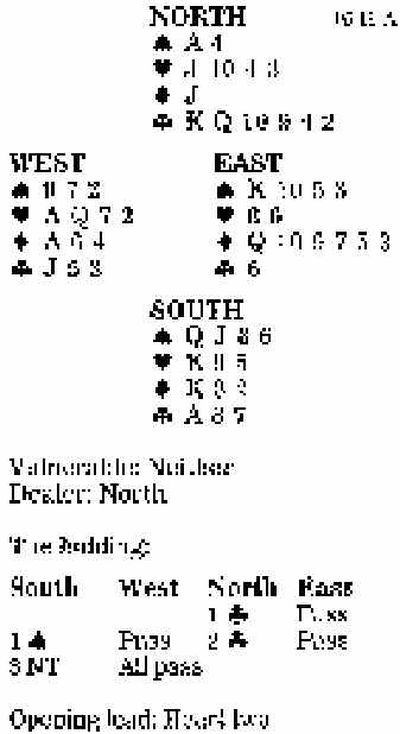

Your lead of the heart two against three no-trump runs around to partner’s eight and declarer’s nine. At trick two, declarer plays the heart king, which you win with your ace. Where do you go for honey?
You need to count declarer’s tricks. When dummy comes down with a significant source of club tricks and declarer does not first attack that suit, he can surely run the clubs. So you can count South for six club tricks, two tricks in hearts once he has knocked out your queen, and one in spades. It looks as if you need partner to come through for you in diamonds — but how likely is that?
Given South’s jump to three no-trump, that is improbable. Declarer would surely have taken a slower approach with nothing at all in diamonds. More sensible is to play partner to hold the spade king to give you a fighting chance (very likely, else declarer would have played on spades, not hearts). In addition, East needs to hold either the spade queen or both the queen and 10 of diamonds.
You must switch to a spade at trick three, and it is important to play the spade nine to let your partner know you do not have an honor in the suit. If partner has the spade K-Q, he will know from his own hand to continue the suit. Otherwise, as here, he will play a diamond (the queen, of course, to pin dummy’s jack) through declarer, to set the hand at least one trick.
Bid with the aces
South holds:
| •9 7 2 | |
| •A Q 7 2 | |
| •A 6 4 | |
| •J 5 3 |
| South | West | North | East |
| 1 • | Dbl. | ||
| ? |
Answer: Bid one heart rather than redoubling. It is a common fallacy that redoubling here shows 9-plus points and that all other actions deny that much. Instead, only redouble when you have at least two places that you want to defend. Here, if the opponents bid either black suit, you could not double, so just make the natural call, as if they had not bid at all.