Bridge

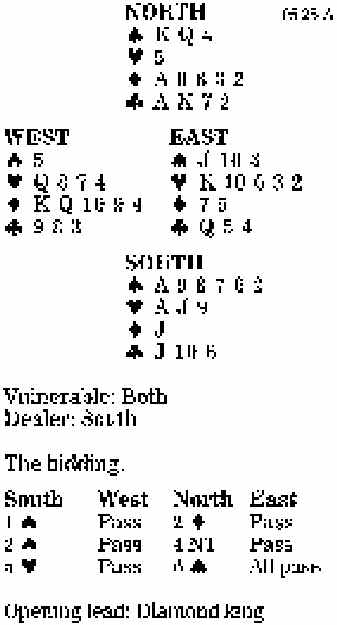
There are certainly more complicated routes to the excellent slam on today’s hand, but North-South was not a regular partnership, and North, quite reasonably, took a direct route. If you want to set yourself a challenge, cover up the East-West hands and plan the play in six spades.
Your first thought might be that it would be easy to ruff two hearts in the dummy. However, if the opposing trumps are 3-1, that will promote a trump trick for East-West. If the club finesse is also wrong, that line will spell defeat.
As usual, the answer lies in counting your tricks. You have six spade tricks (assuming a reasonable break), one heart, one diamond and two clubs on top, 10 in all. You can establish an extra trick in clubs once you have lost to the queen. That makes 11, so you need only one heart ruff in the dummy.
The correct sequence of plays is to win the diamond ace, cash the spade king (always draw as many trumps as you can afford), ruff a diamond, and run the club jack. Say East wins and returns a trump. You win in dummy, play a heart to your ace, and ruff a heart. Now come back to hand with the club 10 and draw the last trump. You have the rest of the tricks: your trumps, and two club tricks, which will allow you to discard your losing heart.
Bid with the aces
South holds:
| • J 10 3 | |
| • K 10 6 3 2 | |
| • 7 5 | |
| • Q 5 4 |
| South | West | North | East |
| 1 • | Pass | ||
| 1 • | Pass | 3 • | Pass |
| ? |
Answer: Raise to four hearts. Pessimists would look at the six points and calculate that they had a subminimum hand. Realists will see five (as opposed to four) decent trumps and a fitting club card for partner’s likely club length. Understanding that they have quite a bit more than a bare minimum, they would bid game.