Bridge
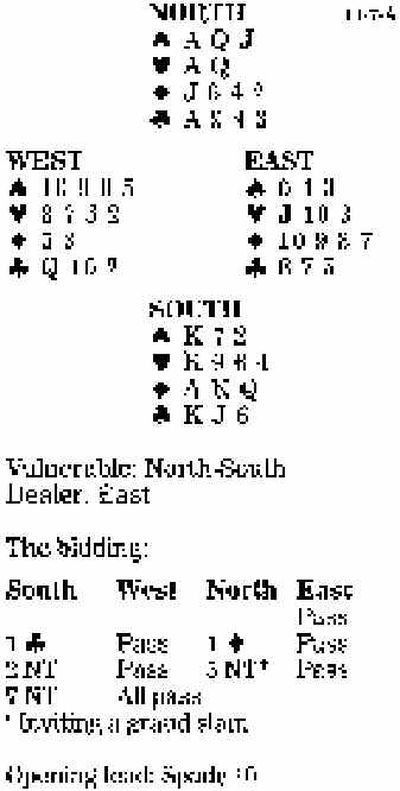

When South shows 18-19 points at his second turn, it gives North a problem. Bidding four no-trump would invite to a small slam and would not be forcing. Bidding five no-trump is an invitational message, but one level higher. It says bid a grand slam if you are top of the range.
South carries on to the grand slam with his maximum, hoping that his top diamonds will help to solidify his partner’s suit. The four-card holding opposite is a disappointment, but the contract still has good play.
On the lead of the spade 10 against seven no-trump, South must be careful about the timing of the hand. Both red suits need to be unblocked, but he should also play the hand to make his own distribution as unclear as possible.
What declarer must not do is cash the four diamond tricks too early and, in the process, discard the heart menace from his hand. He wins the spade lead in dummy, then takes the three top diamonds and goes over to the dummy with the heart ace and cashes the heart queen. He comes back to the spade king and takes the heart king. When the jack and 10 of hearts fall, the heart nine is the 13th trick, and South does not need the club finesse. But had the hearts not behaved in such a friendly fashion, declarer would have gone over to the club ace, cashed the diamond and spade winners, pitching his heart, and have taken the club finesse at the end.
Bid with the aces
South holds:
| •6 4 3 | |
| •J 10 3 | |
| •10 9 8 7 | |
| •8 7 5 |
| South | West | North | East |
| 1 • | Dbl. | Pass | |
| ? |
Answer: Bid one heart. Yes, this is a nightmare hand, and yes, bad things may be about to happen, but that does not mean you should pass one diamond doubled. That may be just as disastrous as bidding here.