The gift of giving

It’s no secret that kids can’t wait to receive gifts come Christmas, but how about giving them? Sometimes, as parents (and grandparents), we get so tickled about trying to find special presents for our little ones that we may forget to pass on the most important gift of all: the joy of giving. The truth is, children love to give. (Just think about all of those crayon-colored pictures they shower upon us with glee.) When children create something with their own hands, they believe they have imbued it with magic — rightfully so — and are thrilled to share it with their loved ones. We can nurture this sense of passion and pride by encouraging the sentiment of handmade gifts rather than store-bought items.
Who cares how much money we have? We can always make do.
Working together, you and your youngster can pen “wish lists” full of goodies that your child wishes to create for family and friends. Handcrafted holiday gifts don’t require lots of know-how or a big investment; in fact, they become even more miraculous when repurposed from everyday items we take for granted. Rocks, egg cartons, twigs and old t-shirts are the building blocks of make-do magic.
ROCKS OF ART
Gather Up:
Smooth stones
Paint (Acrylic craft paint works great on stone. Look for the “AP Non-toxic” label to ensure safety for your pint-sized Picasso.)
Paintbrushes with tapered tips for details
White pencil or crayon
Magazine or calendar photos for reference
Newspaper
Get Inspired:
Look to the book “Let’s Rock!: Rock Painting for Kids” by Linda Kranz to find step-by-step illustrated directions for decorating small stones with flowers, animals, holiday designs, and more. You’ll also find free instructions and inspiration on artist Patty Donathan’s Web site www.petarock.homestead.com.
Get Busy:
Wash rocks with warm, soapy water and let them dry overnight.
Prepare a workspace with plenty of newspaper.
Let your child’s imagination run wild. She can sketch a preliminary design on her rock with a white pencil or crayon, or wing it freehand. Either way, she is sure to create a “rock of art.”
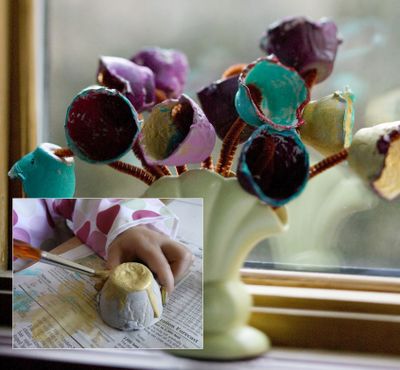
EGG-CARTON FLOWERS
Gather Up:
Empty egg cartons (preferably the cardboard kind)
Paint (Acrylic, watercolor or tempera — again, look for the “AP Non-toxic” label.)
Paintbrushes
Pipe cleaner “stems”
Scissors
Get Inspired:
You’ll find a tutorial with detailed instructions and photos by searching “egg carton flowers” at www.skiptomylou.org.
Get Busy:
Cut egg cartons into individual cups. (Young children may need some help with this.)
Snip shapes from the edges to create tulips and other fanciful flowers.
Paint petals all colors of the rainbow.
When paint is completely dry, poke a pipe cleaner up through the bottom of each flower. Loop the top inside the flower and paint it too.
Additional pipe cleaners can be cut, folded and crimped onto flower stems like leaves. You could also try strands of ribbons.
TWIG FRAMES
Gather Up:
A photo, greeting card or kid-drawn picture to frame
2 handfuls of slim, straight twigs (One bunch should be about 2 inches longer than the picture you plan to frame; the other should be about 2 inches wider.)
Natural fiber twine or yarn
Get Inspired:
Check out the simple rustic twig frame at www.makingfriends.com/photos/framestick.htm. For a charming but more challenging twig frame project, visit www.countryliving.com/crafts/projects/fall-crafts-1007.
Get Busy:
Help your child lay the vertical stick bundles along the sides of the picture, making sure the stick ends extend evenly past the edges.
Lay the horizontal twig bundles across the vertical bundles at the top and bottom of the picture.
Wrap and tie twine around the corners where the stick bundles cross, making an “X” pattern.
Glue the picture onto the back of the frame (hot glue works well).
Tie a small loop of twine to the top bundle of twigs for hanging.
PRETTY POTHOLDERS
Gather Up:
Potholder Loom (Find wooden looms at http://naturalbaby.stores.yahoo.net/357500-loom.html.)
Old cotton t-shirts in an array of colors
Scissors or rotary cutter
Crochet hook
Get Inspired:
Check out the tutorial with photos and video posted on the CraftSanity Web site (http://craftsanity.com/?p=2783).
Get Busy:
Cut t-shirts into rectangles about 2.5 inches by 6 inches in size. (Test a couple pieces for stretchiness before cutting up a whole shirt.)
Fold each rectangle in half and snip a slot through the middle, careful not to cut all the way through the ends.
Stretch loops across the loom horizontally.
Hook and weave vertical loops through the horizontal loops until the loom is full.
Slip a crochet hook through one corner loop, grab the next loop in line, and pull it through the first loop. Repeat until you have removed every loop from the loom. Use the final loop to hang your pretty potholder on the wall.