Ask the Builder: Installing plywood panel will protect pocket doors

Q. I’m planning to install a few pocket doors in my new home. I already know at these locations I’ll have heavy mirrors and artwork on the walls where the door slides in and out of the pocket. I’m afraid the small anchors I will have to use will fail over time and the things will come crashing to the floor. What can I do to strengthen the wall to accept a traditional screw or two that won’t pull out? – Connie B., Eugene, Oregon
A. You’re not the first person to be faced with this situation with pocket doors. The danger is you might scratch a door because you put in an anchor, a screw or nail too far that created a nasty blemish on the door as it slides into the pocket.
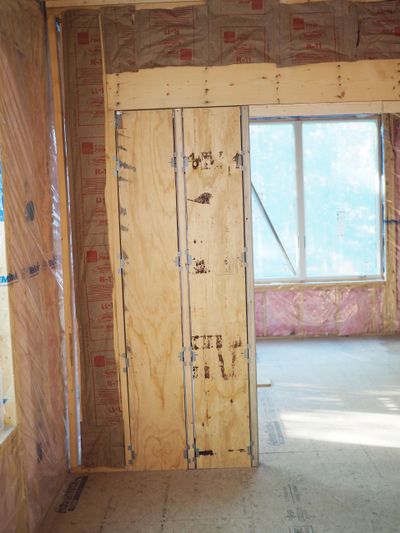
The great news is you can now easily install 3/4-inch-thick plywood panels in between the steel-wrapped wall studs that create the pocket for a pocket door. I wish this option would have been available years ago when several of my customers had the same issues with heavy objects.
L.E. Johnson, a U.S. company that makes superb pocket door hardware, came up with a solution to this problem using simple U-shaped thin-metal hardware. These thin brackets slide onto the edge of pieces of 3/4-inch plywood that’s cut to fit the space between the thin studs that create the pockets.
It takes just seconds to attach the brackets to the edges of the plywood. You attach four of these brackets on each edge of the plywood. The brackets then slide onto the metal wrapped studs so the plywood stays in place.
The drywall contractor can attach his drywall to the wood-wrapped studs or put his screws into the plywood as well. The plywood is sufficiently strong that screws that just penetrate 3/4 inch will easily support mirrors or framed art that might weigh close to 100 pounds.
I can’t imagine anything weighing much more than that and even if it did, you’d just install a few more screws into the plywood to distribute the weight over several screws.
I installed these simple brackets and plywood on two pocket doors at my daughter’s new home and had the job done in less than 10 minutes. It’s important to realize you should select plywood that’s very flat.
If you have plywood that does have a bow to it, be sure to install the plywood so the bow faces out to the room. This ensures the door will not rub against the plywood as it slides in and out of the pocket.
Q. I’m going to paint the outside of my one-story ranch home to save some money. I’ve never tackled a job this big and need some tips. I’m not in a huge rush, being retired, so I can pace myself. What are some of the most important things to do and what’s a great paint so I don’t have to do this again for many years? – Jimmy P., Clemson, South Carolina
A. Here are some tips that have served me well for decades.
The first thing to realize is that paint is just colored glue. Paint chemistry is extremely close to all sorts of different adhesives. Glue typically sticks best to clean, dry and sound surfaces. This means you need to spend a decent amount of your time preparing the surface you intend to paint.
You may be tempted to use a pressure washer to clean the surface of what you’ll be painting. I maintain that these infernal machines don’t get things as clean as you might want. In all my tests, there’s always a very thin film of dirt left behind after aiming the high-pressure stream at a surface. I prefer to wash my surfaces using a solution of oxygen bleach mixed with some liquid dish soap. I use a soft brush, the kind used to clean RVs, to apply the cleaning solution. The rubbing with the brush and rinsing with clear water removes all traces of dirt.
You may be tempted to paint in full sunlight on a breezy day. Paint chemists I’ve interviewed in the past have told me that overcast days with no wind are the best as the paint tends to dry a little slower. Pay close attention to all the instructions on the finish paint can label and follow them to the letter.
If you have to prime bare wood or metal, look once again to the label on the finish paint can. Some paints prefer a particular primer. To get the best results, apply the finish paint as soon as the primer can be recoated. This allows for the best mechanical and chemical bond between the two different paints.
I’ve had the best long-term success using finish paints that are made with a urethane resin. The resin is the glue component of the paint. Urethane is extremely sticky and if you follow all the directions on the paint can label, you might not paint again for 15 years.
Subscribe to Carter’s free newsletter and listen to his new podcasts. Go to: https://www.AsktheBuilder.com.