Bridge

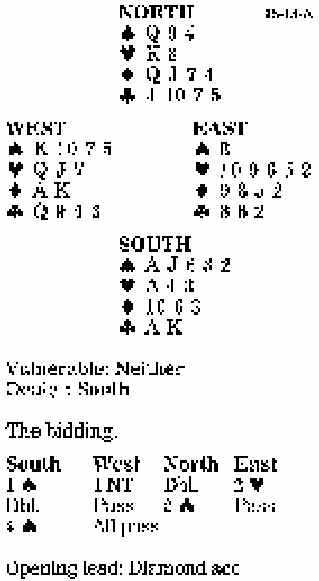
One of the hardest things to do in bridge is to ignore what might have been and to focus on the present. Here, forget about the penalty you might have extracted from two hearts doubled, and try to make the four-spade contract you have bid.
West leads the diamond ace, then king (showing a doubleton in his methods), and switches to the heart queen. Your only problem now seems to be restricting your trump losers to one.
As you are missing only 15 points, West must have the spade king. If the suit breaks 3-2, there will be no problem, but West may have four spades. Indeed, since you can place East with nine red cards to West’s five, it is quite likely that East has a singleton spade. Can you get a better clue?
Try winning the heart ace in hand at trick three to play the club king. East may think that his partner has the ace and so might tell him how many clubs he has in order to help West decide what to do after winning his club ace. In practice, East plays the club two under your king.
Since East’s play suggests he has a three-card club suit and therefore a singleton spade, you now cash the spade ace and play a spade toward the dummy, inserting the nine if West plays low. Had East played a high club on the first round of the suit, you would have cashed the spade ace and played a spade to dummy’s queen.
Bid with the aces
South holds:
| •K 10 7 5 | |
| •Q J 7 | |
| •A K | |
| •Q 9 4 3 |
| South | West | North | East |
| Pass | 1 • | ||
| ? |
Answers: Double, rather than bidding one no-trump. Although your hand is in the range for a no-trump overcall and you do have two diamond stops, your shape is far more suited to making a takeout double. Also, the fact that your partner is a passed hand means that doubling will be far less likely to expose your side to a penalty than overcalling one no-trump.