Bridge
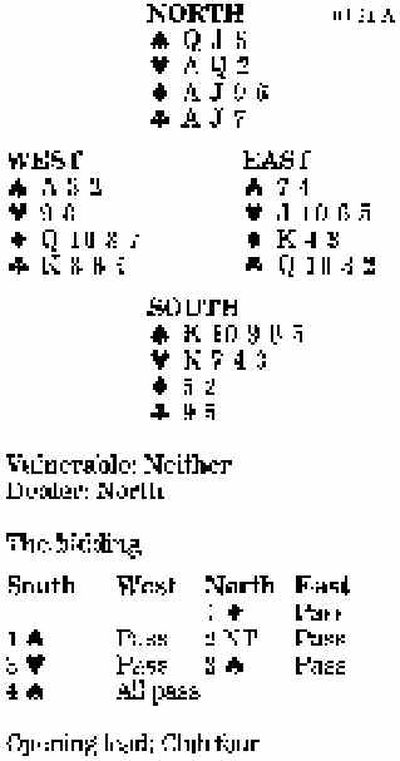

Over North’s jump rebid of two no-trump to show a balanced 18-19 points, South should bid three hearts to try to find an eight-card major-suit fit. Lacking four hearts, North shows his three-card spade support, and that gets South to the sensible contract of four spades. But make good use of your nines today!
On a low club lead from West, declarer should play small from dummy in case West has led away from a suit headed by honor-10 — in which case South might be able to use the club nine to establish a discard for his diamond loser. But East takes the club lead cheaply and continues the suit. South wins with dummy’s ace and starts drawing trump.
When West wins his spade ace, he plays a third club. South ruffs this and should not test hearts just yet. Instead, it is better to try to generate an extra chance — just in case. It is correct to finish drawing trump, then play on diamonds next, leading low to dummy’s nine. Good news: East takes the nine with a top honor rather than with the 10. Now South can ruff the next club and test hearts ending in hand. When that suit fails to break, it is time to fall back on the second chance. Declarer can lead up to dummy’s diamonds and finesse the jack, then cash the diamond ace to throw the heart loser away: 10 tricks made.
Bid with the aces
South holds:
| •Q J 6 | |
| •A Q 2 | |
| •A J 9 6 | |
| •A J 7 |
| South | West | North | East |
| 1 • | Pass | Pass | |
| ? |
Answer: Bid two no-trump, which in the balancing seat shows a flat hand in the range of 19-21, not the unusual no-trump. If you start by doubling, you can never show this precise high-card range, so get your hand off your chest at one go.