Holiday party favors: Little gifts can bring big smiles

With school and neighborhood holiday parties around the corner, help your child get a head start on party preparations with one of our fun and easy-to-make party favors.
CHRISTMAS CONFECTIONS
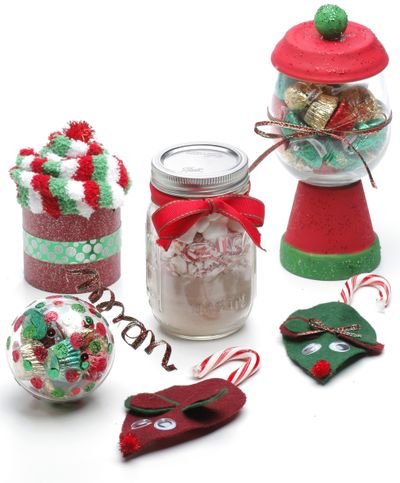
This pair of festive holiday socks packaged in a fun way will make a tiny partygoer’s day.
What you need:
Pair of fun holiday socks
Rubber band
Piece of card stock
Scissors
Glue
Ribbon
Craft pompom in red
Cellophane and ribbon for packaging
Instructions:
1. Begin making your “cupcake” by rolling up the pair of socks. When you are done rolling, take a rubber band and secure so that it keeps its form.
2. Next, take the card stock and cut a strip 12 inches long and about 2 inches tall. This will be the cupcake “liner.” Wrap it around the cupcake. Trim off any excess, making sure that you leave enough so that the ends of the card stock overlap by about 1 inch.
3. Using glue, secure the ends of the card stock.
4. Cut a piece of ribbon long enough to wrap around the cupcake and glue it down the center of the card stock.
5. To finish, tuck a red craft pompom into the top of your “cupcake.” (Tip: Package your “sock cupcakes” in cellophane tied with holiday ribbon.)
MERRY MOUSE’-MAS
As cute as they are tasty, these easy-to-assemble candy cane mice are the perfect way to get everyone in the Christmas spirit.
What you need:
Paper
Pencil
Scissors
2 pieces of felt in two colors (preferably red and green)
Glue
Googly eyes
Craft pompom in red
Box of candy canes
Ribbon
Instructions:
1. Begin by creating a stencil for the mouse’s body and ears. With a piece of paper and a pencil, draw a teardrop shape that is 4 inches long. On the same piece of paper, draw the ears. The shape should resemble a peanut, with the center not as wide; it should measure about 3 inches in length.
2. Cut out the shapes. (Tip: If you do not feel comfortable drawing the stencils freehand, you can find several free patterns for this craft on the Internet).
3. Trace the body stencil onto one of the pieces of felt and cut it out. Repeat with the ear stencil, making sure that the felt is of a different color than the body.
4. Begin gluing on the mouse’s features to the body. Glue a pompom at the point for the nose. About 1 inch above that, glue on the googly eyes. Next, using scissors, cut two slits in the center of the mouse about inch above the eyes.
5. Thread the ears through the slits and adjust. This should create a loop in the back of your mouse to hold the candy cane. Take the candy cane and place it through the loop so that the curved part looks like the mouse’s tail.
6. To finish, cut two small ovals from the felt scraps. Glue them inside the ears for added detail. (Tip: You can make tiny ribbon bows and glue them on some of the mice so you have girl and boy mice).
’TIS THE SEASON FOR SWEETS
Whether you fill it with red and green gumballs or an assortment of holiday candy, a homemade gumball machine is guaranteed to put a smile on the face of anyone with a sweet tooth.
What you need:
Small clay pot
Foam brushes
Acrylic craft paint in red and green
Small clay saucer
Small wooden ball
Small fish bowl
Loose glitter in red and green
Hot glue gun
Scissors
Assortment of holiday candy
Ribbon
Instructions:
1. Begin by painting the base of the clay pot (do not paint the rim) with a foam brush and red acrylic craft paint. While the paint is still wet, sprinkle red glitter all over the base so that it sticks. Let dry.
2. While the pot is drying, paint the clay saucer red. Again, while the paint is still wet, sprinkle it with red glitter. Let dry.
3. Once the pot has dried, take another foam paintbrush and paint the rim with green acrylic paint. Sprinkle the wet paint with green glitter. Let dry.
4. Paint the wooden ball using green paint. Sprinkle the wet paint with green glitter. Let dry.
5. When all parts have dried, assemble the gumball machine. Glue the bottom of the fish bowl to the bottom of the pot (leaving the fish bowl open at the top for filling).
6. Next, turn the clay saucer upside down and glue the wooden ball in its center. This will be the lid. When the glue has dried, fill the “gumball machine” with red and green gumballs or an assortment of holiday candy and place the lid on top.
7. To finish, cut a piece of ribbon and tie it around the glass bowl.
DELICIOUS ORNAMENT
Ornaments are always a great party favor, and you can take it up a notch by making ornaments filled with candy that kids can enjoy in more than one way.
What you need:
Clear fillable, plastic ornament
Acrylic craft paint in red and green
Loose glitter in red and green
Red and green sequins
Ribbon
Scissors
Assortment of holiday candy
Instructions:
1. Take a clear plastic ornament and decorate it. To make a polka-dot ornament like this one, take a foam brush and red acrylic craft paint and make pea-size polka dots evenly spaced across the surface (leaving room for green polka dots and sequins). While the paint is still wet, take loose red glitter and sprinkle it on each polka dot so that it sticks. Let dry, then gently brush off any excess glitter.
2. Repeat the previous steps, but this time using green acrylic craft paint and green glitter. Once you have finished, take green and red sequins and glue them in the open areas between the polka dots. Let dry.
3. Cut a piece of ribbon and thread it through the hole at the top of the ornament. Make a knot and let the ends dangle. Curl the ribbon using a pair of scissors. (Tip: You can use wire-lined ribbon to make a curly spiral that will hold its shape.) To finish, fill the ornament with an assortment of holiday candy such as M&Ms, Reese’s Peanut Butter Cups or Hershey’s Kisses.
DRINK AND BE MERRY
The perfect companion for a cold winter day, a jar layered with yummy cocoa, peppermint and mini marshmallows is sure to be a hit with all ages.
What you need:
Mason jar
Box of hot chocolate packets
Box of candy canes
Bag of miniature marshmallows
Scissors
Ribbon
Instructions:
1. Begin by opening the packets of instant hot chocolate mix and pouring the contents into the Mason jar until it is filled halfway.
2. Next, break 5-6 candy canes into tiny bits with your hands. (Tip: Alternatively, you can place them in a plastic sandwich bag and use a rolling pin to break them.) Layer the candy bits on top of the hot chocolate mix, filling about a fourth of the jar.
3. Fill the jar to the rim with mini marshmallows. Place the seal on the jar and screw on the top.
4. To finish, tie a bow around the jar using the ribbon.