How a digital thermometer will improve your baking
Of all the kitchen equipment that punches above its weight, the instant-read thermometer is among the best in class. Unlike a lot of other tools, it takes up very little space and will quickly justify the cost, even if you splurge for a high-end model.
But if you’re only pulling your thermometer out for meat, you’re not employing its full potential. This kitchen staple is just the thing to help you be a better baker, whether you’re interested in bread, caramel, ice cream or any number of treats. (As to specific models, I’ve had a Thermapen for years now and previously relied on a less expensive CDN model.)
Still, keep in mind that temperature is just one cue among many that you can use to judge when your food is done. While temperature is a precise measurement, some thermometers may be a few degrees off, and you may get varied readings depending on where you insert the probe. So just as you shouldn’t only rely on a recipe’s suggested cook time, be sure to engage your other senses, using your eyes, nose and even ears (remember the “Great British Baking Show” contestant who listened to his bakes?) to make the ultimate determination. Of course, any good recipe will provide you with these cues, too.
Now let’s take a look at how to put your thermometer to work.
Butter
Yes, you read that right. Especially if you are baking in a particularly hot or cold environment, or have struggled to cream butter and sugar in the past, I want you to take the temperature of that stick. Butter that is too cold or too warm won’t properly hold onto air bubbles incorporated during beating, and when you don’t have that aeration, you won’t have well-risen, tender results. Even a matter of a few degrees can have an impact on the consistency of butter and how well you bake with it.
In “On Food and Cooking,” Harold McGee says a “relatively cool” 65 degrees is the best temperature for aerating butter. Cookbook author Stella Parks on Serious Eats makes a compelling case for aiming on the low side, at 60 degrees, because room-temperature sugar and the friction created by electric mixers can immediately start to warm the butter. She says that at around 68 degrees, butter’s “ability to stretch and expand during the creaming process tops out,” and anything higher risks disaster.
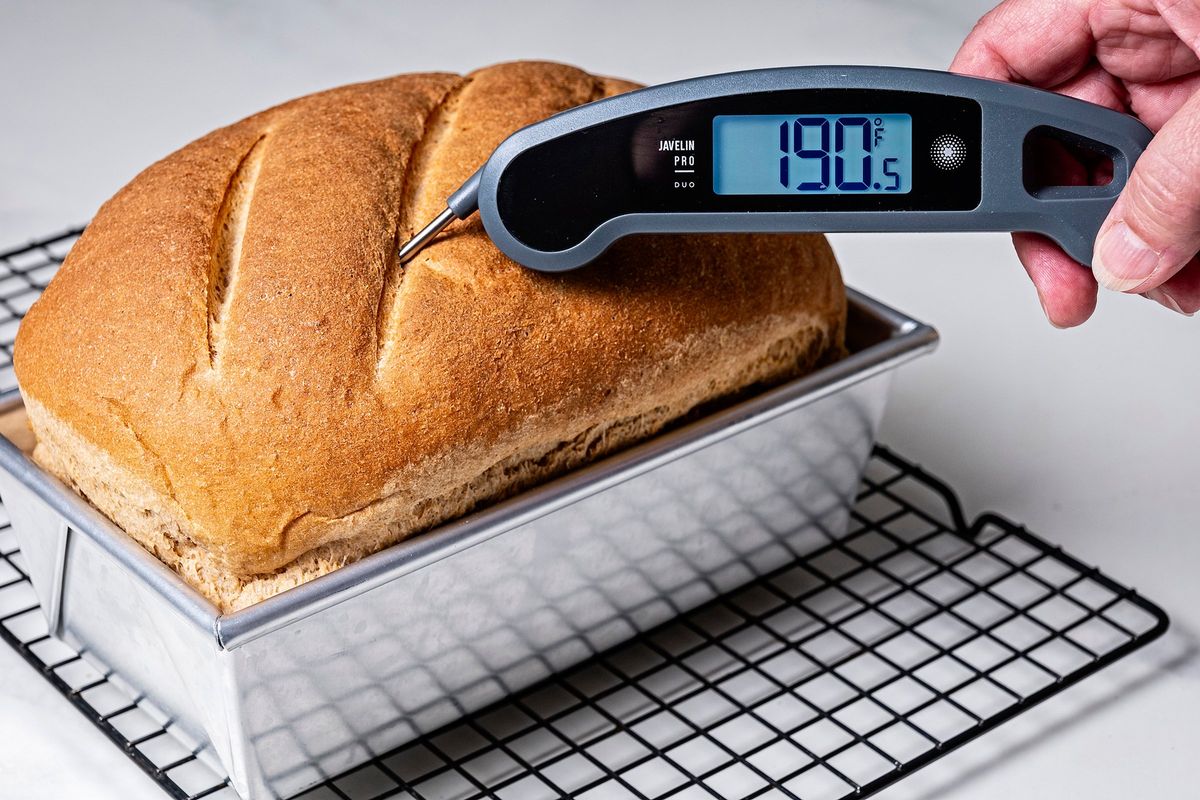
Bread
Cutting open a quick bread or yeasted loaf and finding a raw, gummy center is not fun. King Arthur Baking has a nice primer on knowing when your banana bread is done, in which PJ Hamel recommends getting your quick bread to 200 to 205 degrees, as measured in the center. Hamel says that overall, 190 degrees is a good benchmark for most yeasted loaves and rolls, with enriched options particularly well-suited to the lower end of the spectrum while leaner, more rustic options can be pushed toward 210 degrees depending on the recipe and your personal preferences.
It’s crucial to not only rely on the internal temperature, though. In his bread-centric Wordloaf newsletter, Andrew Janjigian explains that the interior of a bread will not only not exceed 210 degrees, but will also hang out there for an extended period of time, including before (and after) the exterior of the bread has properly browned. So by all means use the internal temperature as one data point, as long as you pay attention to the color of the crust, as well.
Temperature is important long before you pull bread out of the oven. According to King Arthur, yeast is happiest at temperatures between 70 and 100 degrees. In the summer, I go for the lower end of the range and the winter higher, to give the dough its best chance at rising well. Over time I’ve developed a pretty good feel for water temperature by sticking my finger under the tap, but I started by cross-checking with a thermometer until I could trust my intuition. Doughs typically thrive in the upper 70s, and if you struggle to get them to rise, it’s worth checking the temp – yes, you can stick the thermometer right into the dough – to see where it is and adjust accordingly, either by using a different temperature water to start or moving the dough to a warmer or cooler spot. (If you want the real nitty-gritty, read up more on desired dough temperature.)
Custards and creams
Eggs are particularly sensitive to high temperatures and can easily turn dry and rubbery when overcooked. So desserts that lean heavily on them also require some precision. For crème anglaise, a stirred custard with flavored milk and/or cream, eggs and sugar, Shirley Corriher in “BakeWise” recommends keeping the temperature under 180 degrees. The custard thickens at around 160 degrees and can start to curdle at 180 degrees. For ice cream bases, which are essentially a crème anglaise, Cook’s Illustrated pushes the temperature to 180 to 185 degrees to achieve maximum thickness, as the higher concentration of sugar provides a bit more of a buffer against curdling. Similarly, starches (flour, cornstarch, arrowroot, etc.) can prevent curdling. Custards made with them can and should be cooked until they thicken and even approach boiling, or 212 degrees.
For baked custards, including flan and crème brûlée, pull them out when they reach 170 to 175 degrees and jiggle when they are gently shaken, Cook’s Illustrated advises.
Caramel and candy
The chemistry of cooking sugar relies on certain things happening at certain temperatures. Want a perfectly amber caramel sauce? Use a thermometer, in addition to your eyes and nose, of course. The sweet spot for caramel is around 350 degrees, though there is some wiggle room depending on how dark you want it. It also helps to pay attention to temperature when making marshmallows and fudge, tempering (or faux-tempering) chocolate and more. If your probe is long enough to reach into the pot and liquid, for a few bucks you can buy a simple metal pot clip rather than getting a separate candy thermometer.