The best (and worst) dyed Easter egg alternatives
I am not a particularly good crafter, and I’m generally okay with that. (After all, I do possess other, sparingly-useful skills, such as juggling and crossword puzzling!) So when my editor suggested I actually try out some of the alternatives to dyed Easter eggs that we were seeing people make on social media – given the record-high price of eggs – I was already preparing for the kind of epic fails that people often sarcastically caption “Nailed it!”
Dear reader, I dyed what felt like a thousand deaths in my (spoiler alert: ultimately futile) search for a substitute to those pricey, traditional orbs that go in our baskets and serve as the object of our backyard hunts. After multiple trips to the store, several sessions that reminded me of grade-school art classes, and fingers that I’ve resigned will be permanently stained blue, I sussed out which methods are potentially worth a try and which are not all they’re cracked up to be.
First, the losers:
Egg shells: With apologies to Martha Stewart: Blown eggs – in which you make small holes on both ends of eggs then blow into one end, forcing the contents out the other – are not a great option for our frugal times. While you theoretically could subsequently use the egg innards for cooking or baking, therefore saving money, there’s a lot of huffing and puffing that goes into the process, which is certain to leave your eggs and the surfaces they touch pretty germy.
Candy: Recipes editor Becky Krystal and I contemplated a method in which we would dip Cadbury Creme Eggs (another staple of many Easter baskets) into melted white chocolate tinted with food coloring. Becky offered clever ideas (Chill the eggs before dipping them! Use a parchment-paper-lined rack to let them set!), but only when I arrived at the store did I realize that this project was actually way more expensive than just buying real eggs. But this “a-ha”/forehead-slapping moment did not arrive until after I had visited no fewer than three stores looking for the candy, which felt like quite the wild goose-egg chase. I decided to shelve the Cadbury chocolate dip idea.
Jell-O: My attempt at Jell-O eggs was another fail. I ordered a silicon mold online that was described as being for chocolate, fondant, candles or Jell-O, but I should have read the reviews that cautioned against attempting to use it for gelatin. After examining it for several minutes, I determined there was simply no way to de-mold the eggs, once cooled, without squishing them to gooey smithereens. Online, I saw people using vintage Jell-O molds to make vibrant, jiggly creations. If I had more time, I could have ordered a more suitable, similar model. Maybe next year? (Or maybe, by then, eggs won’t be such a luxury?)
The winners (ish):
Plastic eggs: At my local Walmart, I found a kit for $1.98 that included a carton of plastic eggs and packs of dye to color them. The instructions told me to “swirl” the egg and the dye in small plastic bags that were also provided. I wasn’t sure how to accomplish that, and I mentally replayed that “Schitt’s Creek” scene where the characters are flummoxed by a recipe’s instructions to “fold in” an ingredient. I settled for sort of smushing it around inside the bag.
The dyed eggs were near-dupes for the real thing. But even as I contemplated the pretty pastel orbs, I couldn’t help but feel guilty for all the plastic involved. And while the price was right and the results were attractive, there wasn’t anything satisfyingly tactile about the process.
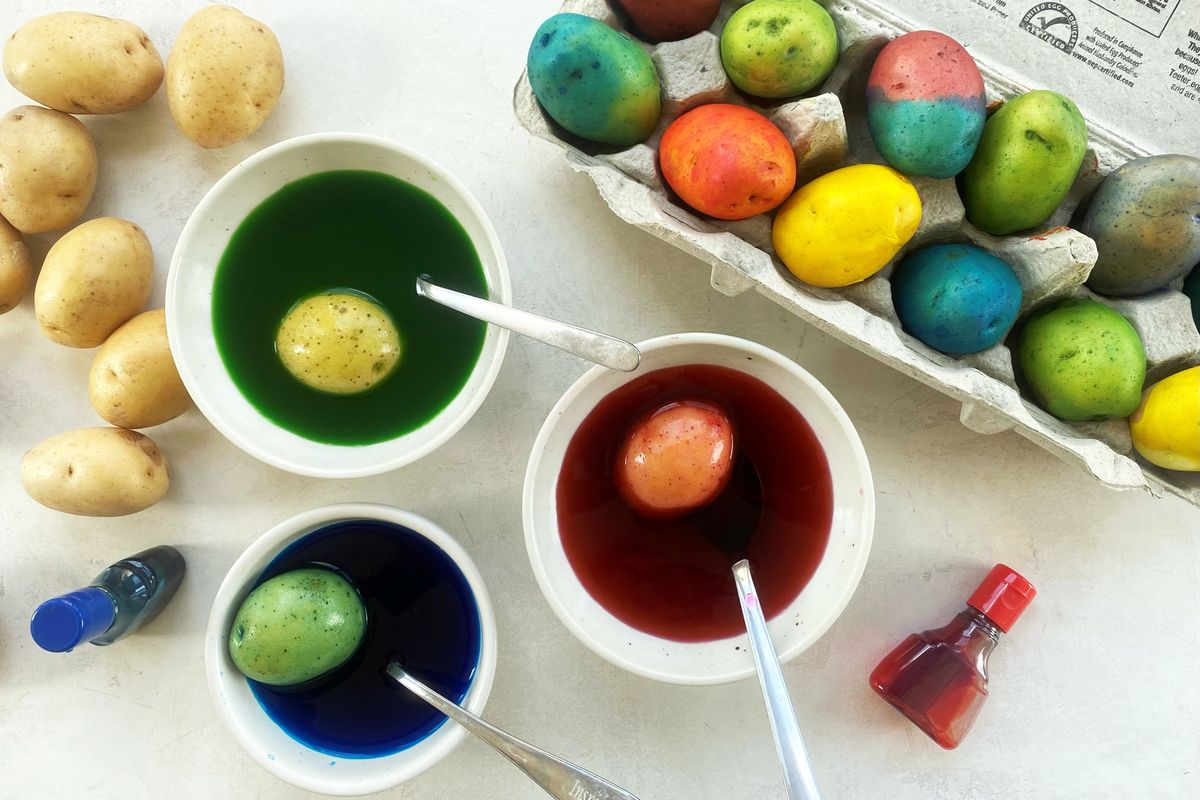
Potatoes: I saw many people making dyed potatoes, but even with the abundant online inspo, it still took some trial and error (see my confession about my crafting skills above). For my first attempt, I used small red-skinned potatoes, and when I painted them with food coloring, per the online tutorials’ guidance, they looked nearly black. And nothing says “Happy Easter” quite like a visually rancid potato, right?
I peeled a few and tried again, this time achieving a much more vibrant color – though the shape, accented by my peeler’s marks, was a little off. After taking seriously the suggestion to use unpeeled white or yellow spuds, my results were considerably better, and if you squinted a little, you could almost imagine that the small eyes were speckles on an eggshell.
Still, there was something sad about the finished product. There was no escaping the fact that these were not eggs, but rather, colorfully dolled-up root vegetables. It made me think of those recipes that creative housewives made with World War II rations. Potato-peel pie might have been patriotic, but was it really so delicious? And the potato in egg’s clothing might not even save you money – which was the whole point of this exercise – if you don’t have the ingredients hanging out in your pantry. I bought a food-coloring kit with four bottles for $6.50, and a bag of mini potatoes for $2.99 (for a total of $9.49). By contrast, a dozen eggs cost $4.97 and a Paas dyeing kit set me back $1.98 ($6.95 total).
Ultimate winner
Which brings me to my conclusion that the superior substitute for Easter eggs is … eggs.
There just isn’t a better alternative, at least not one that replicates both the look of dyed eggs as well as the fun of making them. My childhood memories of a vinegar-scented kitchen (the dye kits we used always called for it) and the thrill of dipping a fragile egg into a colorful bath just couldn’t be replicated with any of the other methods I tried. If you want, you can even eat dyed, hard-cooked eggs after your hunt or crafting session as long as you use food-safe dye and, importantly, don’t wait too long.
I have determined that when it comes to Easter projects, the egg is the only way to go, and that’s a hill I’m willing to dye on.