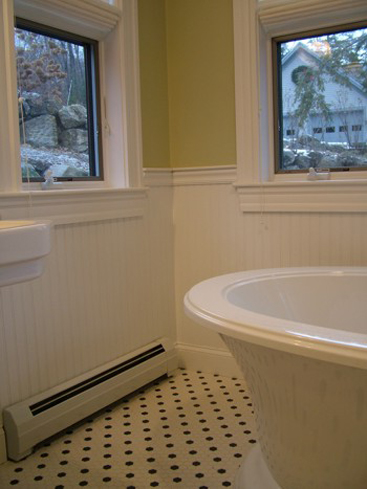
Wainscoting adds a nice touch

Dear Tim: I attended a Christmas party at a home that had wainscoting. It was gorgeous. The beadboard wainscoting was painted a different color than the wall above to accent it.
What can you tell me about installing wainscoting? I like raised-panel wainscoting but would settle for the beadboard if I had to. – Stephanie D., Minneapolis
Dear Stephanie: You’re not the first to be smitten with wainscoting, and you surely won’t be the last. My wife and I have raised-panel wainscoting in our current home, and we will install it in the new home we’re planning.
This traditional wall finish can add character to just about any architectural style. The beadboard wainscoting you saw can produce both a country look and a clean, modern look with its vertical lines.
Years ago, when my sister had her home built, she wanted beadboard wainscoting – the real beadboard, not the imposter material that comes in large sheets.
I was just getting into construction at the time, and I remember installing the horizontal blocking in the walls so there was solid wood to secure the thin vertical strips of tongue-and-groove beadboard. It wasn’t hard to install the blocking, and it’s a good thing to do if you want real beadboard.
But if you’re installing beadboard wainscoting in an existing house, and it’s too late to install blocking, you can easily get the wood to stick to the walls by adding a dab of construction adhesive to a couple of spots on each board before nailing it at an angle through the tongue
Over the years I’ve discovered all sorts of tips about installing wainscoting. Perhaps the biggest time saver is pre-finishing the material before it’s installed. This, in my opinion, should be done whether you decide to paint or stain the wood.
It’s of the utmost importance to make sure you completely coat the entire tongue portion of the wood; the wood can shrink after it’s installed. If this happens, it will reveal a thin vertical strip of wood that’s unfinished. This can be really problematic if it happens at each joint where the grooved edge of a board overlaps the tongue of the adjacent piece.
It’s also easier to paint or stain the wainscoting while it’s flat on a workbench or on top of a piece of plywood suspended between two saw horses. You just need to set the finished material inside a covered area, away from dirt and dust, as it dries.
One major challenge when installing wainscoting in existing homes is dealing with electrical outlet boxes. You need to make sure you’re code compliant with respect to the distance between the edge of the electrical box and the finished surface of the wainscoting. You may have to install approved extensions to comply with the code.
This is not a problem in new construction, as the electrician can mount the boxes so they match up with the surface of the wainscoting.
As you begin to install wainscoting, you’ll quickly realize that you need to be aware of the thickness of the wainscoting and how it plays with the trim it collides with around doors and windows. Harmonizing the wainscoting and existing trim requires great skill and often some master carpentry magic.
You’ll sometimes discover that it’s best to install the wainscoting before any baseboard trim. To make the wainscoting look good where it meets windows and doors, you may have to install extension-jamb filler strips to bring the window and door trim so it sits on top of the wainscoting.
I didn’t have to do this at my home, as my door-casing trim is a full 3/4-inch thick. My wainscoting was only 3/8-inch thick, so the door trim still was above the surface of the raised-panel wainscoting.
With raised-panel wainscoting, as with beadboard wainscoting, it pays to pre-finish the raised panels and all other parts before you assemble them. Some movement may occur with the raised panels that can reveal the unfinished wood.
Raised-panel wainscoting is harder to work with than beadboard with respect to electrical outlets on the wall.
You need to be sure the electrical boxes fall within the flat area of a raised panel; you can’t have them where there is a vertical stile or the beveled edge of a raised panel. As you might imagine, this requires lots of planning ahead of time to determine the center of each raised panel.
Some raised-panel wainscoting comes with its own baseboard as part of the system. I used this at my own home with great results.
I also used this same wainscoting to provide the facing for my basement wet bar. The bar is done in cherry veneer, while the wainscoting in my dining room is painted a rich gold color.