Imagination is key ingredient for Dutch ovens

If campfire cooking is part of your Memorial Day weekend plans, don’t assume you’ll have to settle for hotdogs and baked potatoes.
How does French toast “lasagna” sound? Or beef ribs? What about pineapple-upside-down cake?
Cooking – and baking, for that matter – that’s more sophisticated than wieners on a stick can be done in even the most remote locations. You just need to pack one simple, time-tested tool: a Dutch oven.
“Anything you can cook at home, you can cook in a Dutch oven,” says George Holcomb, 79, who has been cooking with the portable ovens for more than 40 years.
Dutch ovens have been used all over the world for hundreds of years, but in the United States, they’re most often associated with campfire cooking during the Wild West era. They are large pots of either cast-iron or aluminum with tight-fitting lids and are used for boiling, stewing, baking, frying and more. In the outdoors, they’re most often heated with charcoal placed underneath and on top of them, but home cooks can use them inside their conventional ovens or on a gas grill, as well.
Holcomb teaches others how to use Dutch ovens through the Rathdrum and Coeur d’Alene, Idaho, Parks and Recreation departments and jokingly calls himself the “grand exhausted rooster” of Dutch oven cookery.
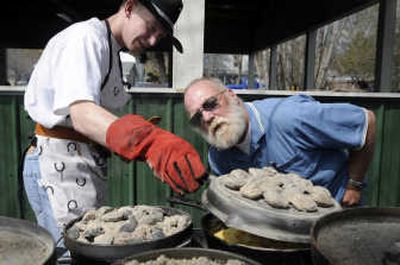
On a recent Saturday, wearing a top hat and an apron held on by suspenders, Holcomb taught a hands-on class to participants in Rathdrum City Park. Inside at least a dozen Dutch ovens, arranged in a circle next to babbling Rathdrum Creek, dishes such as “cowboy potatoes,” German cherry chocolate cake and hot hominy bubbled and baked.
Participants prepared each recipe with help from Holcomb and other members of the North Idaho Dutch Oven Group, who feast together regularly.
“Oh my goodness, you’re gorgeous,” instructor Lloyd Vivian said, as he took the lid off a small Dutch oven, unveiling a plump, golden batch of cornbread.
Meanwhile, Holcomb poured portions of his 18-year-old sourdough starter into plastic bags held open by participants, who were told to add some flour and water to the spongy mixture then bake it as biscuits over their fires.
“This gets more hairy chested as it goes along,” he told one woman – his way of explaining that the flavor of dough starters grows more complex over time.
Holcomb offered cooking tips to participants and revealed the biggest secret of Dutch oven cookery: It’s not difficult.
The first thing people should do with a new Dutch oven is to wash it with soap, then boil water in it, then “season” it by coating it with a layer of vegetable oil or shortening, he said. From then on, don’t use soap to clean your oven again.
“If you look at cast iron under a microscope, it looks like a slice of bread,” Holcomb said.
In other words, it’s porous and your meals could taste like soap if you clean with it. Instead, boil water in the oven to rid it of harmful bacteria and debris.
There are pros and cons to using cast iron versus aluminum ovens. Cast iron heats more evenly, reducing the risk of burning a meal. Aluminum weighs much less, though, which might appeal to campers needing to lighten their loads.
Charcoal placement is another key to cooking with Dutch ovens. Holcomb advises putting most of the charcoal pieces underneath the oven if you’re boiling, stewing or frying. But if you’re baking, you’ll want more charcoal on the lid than underneath so your cake or bread doesn’t burn.
Holcomb also suggests encircling Dutch ovens in some way on windy days, since heat can be whipped away by a breeze. He links old license plates together with key chain rings and surrounds the ovens with them.
Holcomb was a Scoutmaster for 25 years, during which he taught hundreds of boys how to use Dutch ovens. The Rathdrum resident has been married for 47 years, explaining that the secret to a long marriage is to be able to explore your own interests – he has Dutch oven cooking and his wife has church.
“If I want to talk to God, I’m going to go out to God’s country and get belly to belly with him,” Holcomb said.
He’s written a book, “Dutch Oven Cookery,” available for $15 through the Rathdrum Parks and Recreation Department and at some North Idaho bookstores, including Hastings Books, Music and Video.
At the recent cooking event, attendees shared various reasons for taking part. Most were new to Dutch oven cookery, but some were looking to improve their already well-honed skills, including one family that cooks this way in their backyard during winter.
Stephanie Ciampini, wearing a stylish scarf and sunglasses, participated with her 12-year-old daughter Ann. Their family moved to North Idaho recently from Macedonia after learning about the area from a friend who attended Gonzaga University.
“We thought (the class) would be a nice way to get the flavor of what this area is like,” Ciampini said, as she tended to a pineapple-upside-down cake.
Toward the end of the event, instructors shouted to participants to put their “spoons in the pots” and one by one, the Dutch ovens were moved to the park’s pavilion and placed on long picnic tables. People lined up – class participants and casual park goers alike – and dished up spoonfuls, until their paper plates were heaped with steaming food. Many couldn’t even wait until they made it through the line before they dug in and tasted what was on their plates.
Attendees said they were pleased with the results, seeming to agree with participant Matt Conner, of Athol, who earlier in the day said:
“Food tastes better when you’re outside.”
The following recipes also can be made in the oven or on a gas grill. To do it, heat the oven or gas grill to 350 degrees and place the Dutch oven inside.
Hot Hominy Casserole
Adapted for Dutch ovens by George Holcomb from “American Profile” magazine
2 (15.5-ounce) cans yellow or white hominy, drained
1 (4-ounce) can green chilies, or to taste
½ cup onion, grated (if dehydrated onions are used, reconstitute with water)
8 ounces low-fat sour cream
Salt and pepper to taste
1 ½ cups sharp cheddar cheese, grated
6 strips crisp bacon, crumbled (optional)
For an 8-inch Dutch oven, heat with eight charcoals underneath and 12 on top. For a 10-inch oven, heat with 10 underneath and 14 on top. Combine all ingredients, except the cheese and bacon, and spoon the mixture into a lightly greased 8- or 10-inch Dutch oven. Sprinkle grated cheese and crumbled bacon over the top. Cover and bake until cheese is bubbly and golden.
Yield: 5 or 6 servings
Approximate nutrition per serving: 297 calories, 13 grams fat (7.5 grams saturated, 42 percent fat calories), 17 grams protein, 26 grams carbohydrate, 42 milligrams cholesterol, 4 grams dietary fiber, 940 milligrams sodium.
Breakfast Lasagna
Adapted by George Holcomb for Dutch ovens from a recipe in “American Profile” magazine.
8 slices French toast for a 12-inch oven or 10 slices for a 14-inch oven
8 ounces sliced ham for a 12-inch oven or 12 ounces for a 14-inch oven
2 cups grated sharp cheddar cheese for a 12-inch oven or 3 cups for a 14-inch oven
1 (20-ounce) can apple pie filling for a 12-inch oven or 2 cans for a 14-inch oven
Optional topping (choose one):
1 cup granola
12 to 15 cooked link sausages
6 to 8 slices crisp bacon, crumbled
Blend and chill:
1 cup sour cream
½ cup brown sugar
Preheat oven with 17 charcoals on the lid and eight underneath for a 12-inch oven or 21 on the lid and 11 underneath for a 14-inch oven.
Layer four slices of French toast evenly on the bottom of a 12-inch oven or 5 slices on the bottom of a 14-inch oven.
Layer the ham and half of the cheese over the toast.
Place the remaining French toast slices evenly on top of the cheese.
Spread apple pie filling over the toast and sprinkle with the remaining cheese and the topping of your choice (granola, sausage or crumbled bacon).
Bake for 25 to 35 minutes, until warmed through and the cheese has melted. Serve with a dollop of the sour cream topping.
Yield: 6 to 8 servings
Nutrition per serving: Unable to calculate due to recipe variables.
Lloyd Vivian’s German Cherry Chocolate Cake
This cake is best done in a 14-inch or 16-inch shallow Dutch oven.
2 boxes of chocolate cake mix
Eggs and oil, if the cake mix calls for them
2 (21-ounce) cans of cherry pie filling
1 (16-ounce) package of milk chocolate morsels
1 (16-ounce) package of cherry chips (optional)
Preheat the Dutch oven with 10 charcoals underneath and 20 on the lid. Place most of the coals around the outer perimeter of the bottom and lid to heat the sidewalls, with only one or two coals near the center but not next to each other.
Mix the two cake mixes according to package directions.
Pour half of the cake mix into a well-greased oven. Don’t slop mix up the side of the oven, as this will burn and taste bad.
Next, add the cherry pie filling in an even layer covering the cake batter as completely as you can.
Then add all of the chocolate and cherry chips evenly over the cherries.
Add the second half of the cake batter covering up the first three layers.
Bake for approximately 50 minutes, minding your heat so as not to burn the cake.
Serve hot and enjoy.
Yield: 12 servings or more
Nutrition per serving: Unable to calculate.
Door-Slammer Chicken
From The Inland Empire Dutch Oven Society
8 chicken breasts, skinned
2 (8-ounce) bottles of Russian salad dressing
1 (12-ounce) jar pineapple-apricot jam
1 package onion soup mix
Heat the Dutch oven with a 4:1 ratio of coals underneath the oven versus on top. Brown the chicken.
In a separate bowl, mix the remaining ingredients, and then pour the mixture over the chicken.
Cover and bake for 90 minutes. You will need to heat more briquettes partway through to make sure you have enough to last 90 minutes.
Serve over hot rice.
Yield: 8 servings
Nutrition per serving: Unable to calculate.
Beef Ribs
From “Dutch Oven Cooking,” by John G. Ragsdale
3 tablespoons cooking oil
3 pounds beef short ribs, or at least one rib per person
3 tablespoons molasses
2 tablespoons vinegar
1 cup chopped celery
1 cup green peas
1 (8-ounce) can tomato sauce
1 can beef broth
½ teaspoon dried thyme or basil
Heat the cooking oil in an open Dutch oven and brown the ribs on all sides.
Add the remaining ingredients and cover the oven with the lid. Cook for about two hours or until the meat is tender. Occasionally check for adequate liquid; add a small amount of water, if needed.
Remove the liquid fat with a spoon. The vegetables and broth may be served over the ribs.
Yield: 8 servings
Nutrition per serving: Unable to calculate.