Seasonal Kitchen: Seasoned squash hit their peak in winter
Winter squash – pumpkin, butternut, acorn, spaghetti, hubbard and delicata, just to name a few – are grown in summer and harvested in fall, but called “winter” squash for their ability to be stored for weeks through winter without refrigeration.
These squash are both hardy and hearty, their thick-skinned exteriors housing a sweet, creamy interior.
As the seasons change and we move into the colder months, our food preferences also begin to change. We start craving heartier, richer and more comforting meals. We also begin to crave more sugar. I find it interesting how these tough guys offer up their sweetness and richness at just the right time.
Winter squash are one of the oldest known crops, grown as long ago as 10,000 years by some estimates, and originating in Central America. Not only did their nutrient-dense flesh provide nourishment to the tribes, every part of the squash could be used. Their seeds and flowers could be eaten, and their shells could be made into bowls, cups and utensils – even musical instruments.
During the course of those 10,000 years, winter squash began their gradual migration north, becoming one of the legendary “three sisters” of Native American agriculture alongside corn and beans.
These wise tribes were “companion planting” long before the term was coined, cultivating certain crops near others for maximum growth benefits. Corn provided a structure for beans to climb, eliminating the need for poles. Beans provided nitrogen to soil that both corn and squash needed, and squash spread long and low on the ground, creating a living mulch, preventing weeds and deterring pests with their tiny, prickly hairs.
It is said northeastern Native Americans introduced winter squash to the New England settlers, who were not too enthusiastic about them – that is, until they had to survive their first harsh winter. Colonists quickly saw the wisdom in cultivating a plant that provided sustenance and could be wintered over in the root cellar.
Back then, winter squashes were typically cut, baked and moistened with animal fat and maple syrup or honey. This is very close to my favorite way to eat them today, which is simply roasted, dotted with butter or olive oil, drizzled with real maple syrup and sprinkled with salt and nutmeg. Hearty and comforting.
Unlike their cousin “summer” squash, winter squash benefit from a few weeks of “curing” after being picked. This allows their enzymes time to convert starch into sugar, resulting in a sweeter, nuttier tasting squash.
This nutty sweetness becomes even more exaggerated when roasted in the oven as the sugars begin to caramelize. When storing for longer periods, remember to place in a cool but unrefrigerated spot, like the basement. For shorter periods, like one to two weeks, the kitchen counter is fine.
Refrigeration will begin to reverse the enzyme action, converting sugars back into starch, and the squash will begin to lose its flavor.
Varying on the outside in size, shape and colors – from orange, yellow and whites to subtle blues and deep greens – winter squash are all similar on the inside, with carrot-colored flesh and a center full of seeds.
Because of the seeds, winter squash are technically a fruit. And, like all orange produce, they are super nutritious, with high levels of beta carotene and vitamin C. Despite their richness, they are surprisingly low in calories and fat-free.
However, winter squash can seem daunting to work with because of their thick skin. Some varieties, like kobacha or hubbard, are so thick and hard that they are impossible to peel. I have learned not to fight them. I just cut them in half, scoop out the seeds and roast them in the oven.
But sometimes even cutting them in half can be chore. A tip: Create a stable base by cutting off a sliver of the bottom or side, and lay that part down on the counter so it doesn’t roll around. It will make the job easier.
Then, cut the squash in half or quarters. Place the pieces on a greased or parchment-lined baking sheet, skin side up, and roast them at 425 degrees until they are soft enough to pierce with the tip of a knife.
Butternut squash have a slightly thinner skin that can be more easily peeled away with a vegetable peeler. There are also some winter squash varieties, like delicata, that when roasted, their skin is actually edible.
I wanted to share a couple of recipes that might help stretch your imagination when it comes to what to do with winter squash, especially when cooking for people who just aren’t into them. I like slipping them into traditional comfort food dishes. And, because of their inherent sweetness, they are perfect for breakfast.
For example, make French toast out of homemade pumpkin bread. Or, simply stir pumpkin or butternut puree into your pancake or waffle batter, with the addition of a little nutmeg. Nutmeg loves to be paired with winter squash.
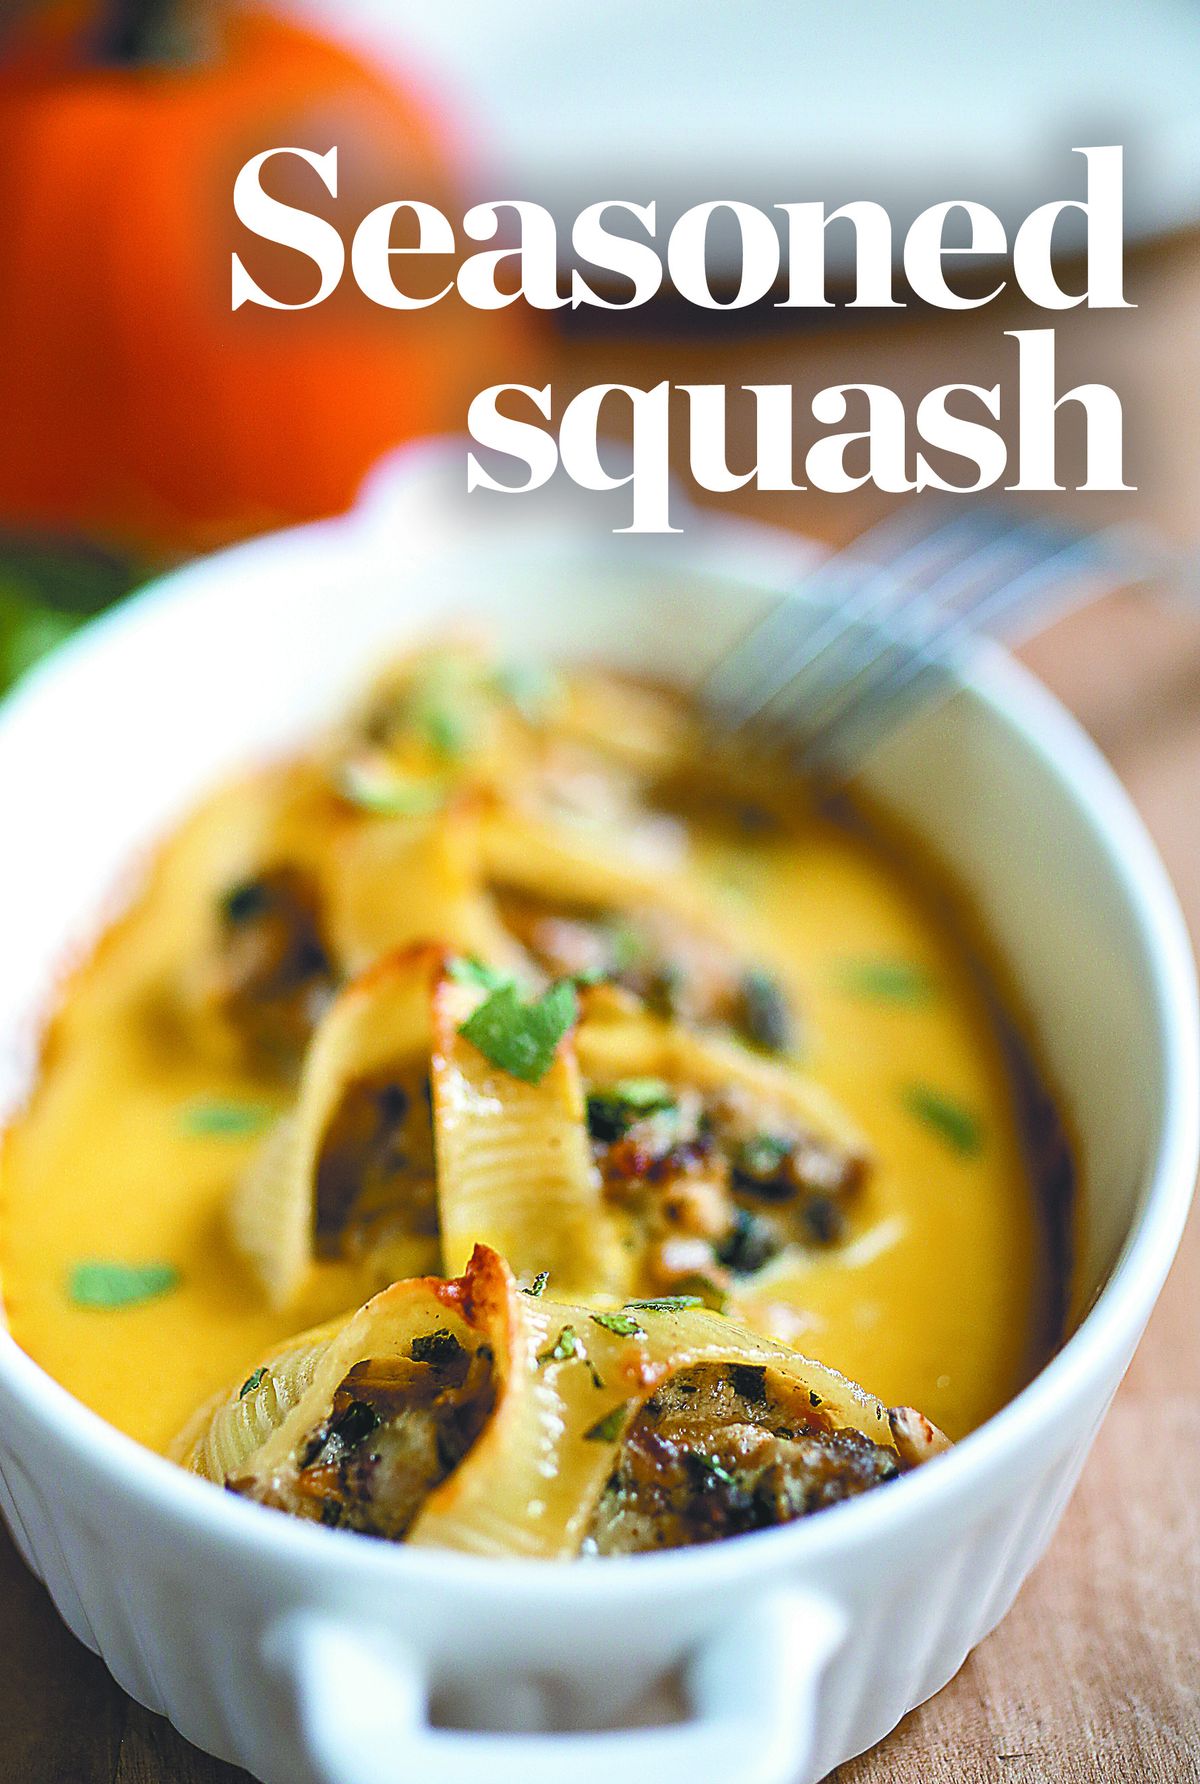
My new favorite way to utilize winter squash is to turn them into sauce. Stuffed shells take on a fall twist when lathered with a creamy butternut parmesan sauce, replacing the typical béchamel, alfredo or tomato sauce. The natural creaminess of winter squash easily lends itself to sauce-making, in which they’re roasted and blended with stock. For a richer and thicker sauce, add a touch of cream.
One fun and easy way to introduce spaghetti squash to kids or other reluctant eaters is to make baked spaghetti squash “lasagna.” Split the squash in half, scoop out the seeds, roast until tender, fluff the spaghetti-like strands with a fork and layer in traditional lasagna ingredients – cooked Italian sausage, ricotta, tomato sauce – and top with mozzarella cheese. Place the stuffed squash back in the oven until warm and melty. It’s pretty hard to resist.
Making pumpkin aebleskivers would be fun to do with your kids. Aebleskivers are golf ball-sized spherical Danish “pancakes,” traditionally made with apples, flour, eggs and cream in a cast iron aebleskiver pan.
This healthier vegan version from Serena Thompson’s Farm Chicks blog is a must-try. It’s made with pumpkin puree and maple pecans, then drizzled with maple syrup.
Serena’s Pumpkin Aebleskivers
2 cups all-purpose flour
3 tablespoons granulated sugar
2 teaspoons pumpkin pie spice
1 teaspoon ground cinnamon
1 teaspoon baking soda
1 teaspoon baking powder
1/2 teaspoon salt
2 cups almond milk (or any milk you have on hand)
1/2 cup canned pumpkin puree
1/4 cup vegetable oil
1 tablespoon apple cider vinegar
Combine dry ingredients in a mixing bowl and whisk until well blended. Add wet ingredients in order listed and whisk until well combined. Heat aebleskiver pan over medium low heat. Once heated, fill each aebleskiver opening with batter, just below the rim. Cook until batter begins to puff and bubble up above the rim. Use a toothpick or skewer to flip the dough, poking into the side of each one. Cook for a few minutes more, until batter is cooked throughout. Once cooked and golden brown, remove from the pan with the toothpick or skewer. Repeat with remaining dough until all are cooked. (This recipe makes 28 aebleskivers.) Serve with maple syrup.
I also love serving with maple pecans (as pictured), which can be easily made by toasting pecans in a pan over medium heat, then drizzling with maple syrup and stirring until syrup has fully glazed the nuts and is no longer runny. Cool nuts on an oiled piece of foil.
Note: If you don’t have an aebleskiver pan, you can use this batter for making delicious pumpkin pancakes.
Stuffed Shells with Creamy Butternut Sauce
2 cups roasted butternut (or any winter squash)
24 large pasta shells, about 10 ounces
16 ounces spicy Italian sausage
1 to 2 tablespoons olive oil
1 cup diced onion
4 cloves garlic, minced
8 ounces mushrooms
2 tablespoons fresh sage
2 tablespoons pine nuts (optional)
15 ounces ricotta cheese
1 cup grated mozzarella cheese
1 teaspoon kosher salt, divided in half
1/4 teaspoon pepper
1 cup chicken stock
1 cup milk
1/2 cup parmesan
1 teaspoon sugar
1/2 teaspoon fresh grated nutmeg
Preheat oven to 425 degrees. Cut squash in half, scrape out seeds and place skin-side up on a greased or parchment-lined baking sheet. Roast for 30 to 40 minutes or until tender when pierced with a knife. Boil water for shells, and cook shells according to directions. Drain, coat with olive oil and set aside.
Meanwhile, brown sausage in a heavy-bottomed skillet over medium heat. Remove sausage from pan and set aside on a paper-lined plate. Wipe out skillet, heat olive oil and sauté onions over medium heat until golden and tender. Add garlic and mushrooms. Sauté on medium-low heat until mushrooms are tender. Add sage, sauté for 1 minute and turn off heat. Place sausage back in pan and stir in pine nuts, ricotta and mozzarella. Add pepper and half of the salt. Stir and set aside.
When squash is tender, remove from oven, lower heat to 350 degrees, and turn squash over to cool. Spoon out 2 cups of roasted squash into a blender with cold chicken stock, milk, parmesan, remaining salt, plus sugar, nutmeg and pepper. Blend until smooth.
In a large greased baking dish or individual ramekins, pour enough sauce to generously coat the bottom. Stuff the shells with meat mixture and place them in the baking dish or ramekins over the sauce. Pour more sauce over top. Cover with foil and bake until heated throughout, about 20 minutes. Remove foil and continue baking. Add additional cheese, if desired, or any remaining sauce to the top, and bake for 10 more minutes.