Bridge

Controlling oneself at the table is critical success at bridge, but retaining control of a bridge hand is equally important. However, at the Dyspeptics Club control is generally lacking in both departments.
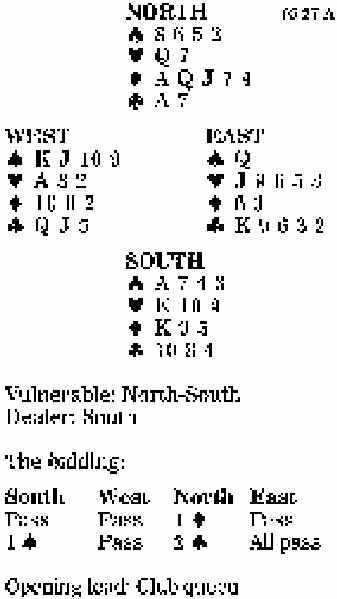
Consider today’s two-spade contract, where at the table South won the club lead with dummy’s ace. Thinking it would be a good idea to draw trump as soon as possible, he played ace and another spade. West thought this an excellent turn of events and continued to draw trumps, winning the second trump with the 10 and continuing with the jack to make the position clear to his partner.
East got the message and resisted the temptation to discard any of his master clubs, throwing three hearts away instead. After extracting all of declarer’s trumps, West cashed his club jack and led his last club to East’s three club winners. In total, declarer went two down, losing three trumps, four clubs and a heart trick. North, never the quietest of dummies, was not pacified when South complacently remarked that there was nothing that he could do.
This is an excellent example of how important it is to retain trump control. Declarer should have won the club lead and played a low trump from both hands. Best defense is for West to win his king and continue trumps, but declarer wins and plays on diamonds, pitching clubs from hand. West does best to refuse to ruff any diamonds, but declarer can always force an eighth trick.
Bid with the aces
South holds:
| •8 6 5 2 | |
| •Q 7 | |
| •A Q J 7 4 | |
| •A 7 |
| South | West | North | East |
| 1 • | |||
| 1 • | 2 • | Dbl. | Pass |
| ? |
Answer: Bid two spades. Partner’s double is competitive (also sometimes imprecisely referred to as a responsive double) and is for takeout, suggesting both unbid suits, in this case the majors. With the spade queen instead of the eight, you would have enough for a three-spade bid, but as it is, two spades is probably enough for the time being.