Bridge

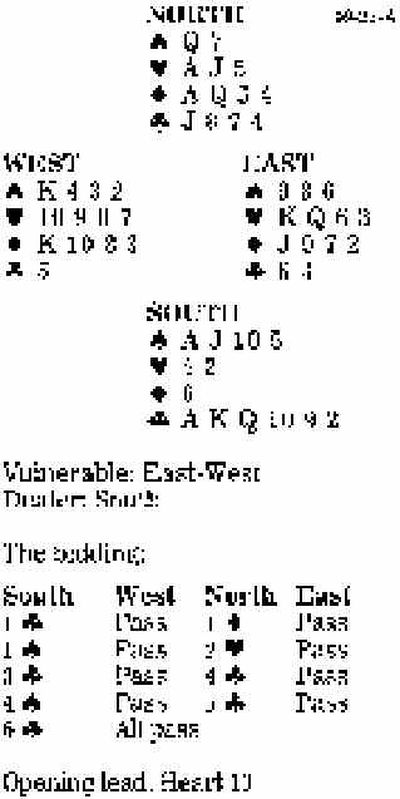
Today’s deal is all about technique as opposed to table presence. How should you play six clubs on a heart lead? Of the two approaches, let us look at the technically superior line first. You can increase your chances over a simple finesse in either spades or diamonds by winning the heart ace, then playing the diamond ace and ruffing a diamond high. Then you cash the club ace and lead the club 10 to dummy’s jack to ruff another diamond. If the diamond king has fallen, you have a home for your heart loser. If not, you take the spade finesse now. The merit of this line is that it allows you to take your chances in order. The bad news is that the extra chance you have created for yourself is really not all that significant.
Personally, I much prefer the psychological line of winning the heart ace at trick one and, without hurrying your opponents inappropriately, smoothly calling for the spade queen and observing your RHO’s reaction. Even against a real expert, I would wager that East would have to be truly inspired not to cover this card, or at least not to consider doing so. If the spade queen isn’t covered, then you should assume it is because West has the spade king, and accordingly you should rise with the spade ace, draw trumps, and take the diamond finesse to discard your heart loser.
Against anything but outstanding defenders, this line has a 75 percent chance of success.
Bid with the aces
South holds:
| •A J 10 5 | |
| •4 2 | |
| •6 | |
| •A K Q 10 9 2 |
| South | West | North | East |
| 1 • | |||
| ? |
Answer: With hands of this sort, start by simply overcalling two clubs, planning to back in later by bidding spades or doubling for takeout. The problem with starting with a double is that if the opponents bounce to four hearts at once, you never get to show your hand economically. So bid your long suit and hope to catch up later.