Ghoulish goodies
Treat your little monsters to fun Halloween snacks you can make at home
No need to dress up for Halloween: All eyes will be on the creepy and cute holiday treats decorating your table.
Throw a party, or just treat friends and family with Halloween goodies.
Here are the recipes and instructions for the tricks and treats on the cover of today’s Food section.
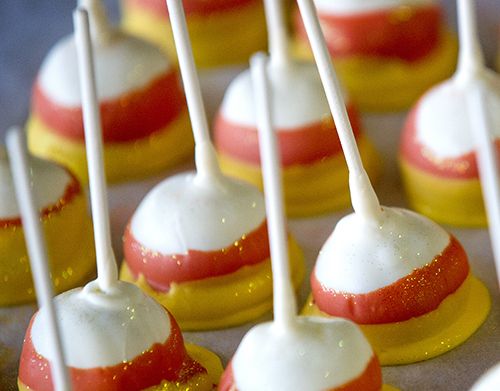
Candy Corn Cake Pops
Celebrations Bakery owner Amber Owens dreamed up these candy corn-inspired cake pops at the request of a customer. She uses scraps and leftovers from other cakes she makes at the Garland Avenue bakery but making them at home is easy, too.
She suggests baking a regular cake mix in a 13-by-9 inch pan and then cooling it and crumbling the cake into pieces. (It can also be baked in advance and stored in pieces in the freezer until you’re ready to use it.) She crumbles the cake into the bowl of a standing mixer and then adds frosting and extract to the mix. For the candy corn cake pops, she recommends 1 vanilla or yellow cake, about 3/4 to 1 cup of buttercream frosting and 1 teaspoon of butter extract to mimic the flavor of candy corn. Process with the paddle attachment until the mixture is the consistency of Play-Doh, she said.
Owens uses a small ice cream scoop to quickly form consistent size balls of cake. Then, she rolls the balls between her palms so they are round. The candy coating she uses for dipping the cake pops at her store are sold only to wholesalers, but she suggests picking up candy coating at Michaels, Hobby Lobby, Joann Fabrics and Crafts or Carolyn’s Cakes, Candy and Cookie Supply, 1705 N. Hamilton St.
Once the balls are formed and the candy coating is melted, Owens takes a handful of 4-inch lollipop sticks and dips them into the candy coating. Then she sticks one in each cake ball and lets it set before dipping into the candy coating. Melt the candy coating carefully (in 30 to 60 second intervals) until it is nice and thin before dipping the balls. She dipped the candy corn cake pops into white, orange and then yellow coatings, letting each layer harden before dipping again. She finished the cake pops with a sprinkle of edible glitter.
Cake pops are versatile and fun. Dream up a flavor you like with different cake, frosting and coating combinations. Owens said she likes to substitute liquor for some of the frosting in grown up cake pops flavors that are popular at her bakery including a Fireball, that is infused with cinnamon whiskey, and Irish car bomb flavor featuring chocolate cake, Bailey’s and Guinness. Celebrations is at 713 W. Garland Ave. Reach the store at (509) 327-3471.
Basic Cake Pops
Here is a basic recipe for cake balls or cake pops adapted from Bakerella.com. Cake pops are bite-sized balls made of crumbled cake mixed with frosting and covered in candy coating on a stick. (Cake balls are the same, sans stick). They are easy to make and form the basis of endless variations of decorated cake pops, cupcake pops, and cake bites. Bakerella also has tons of fun ideas for anyone ready for a challenge.
18.25-ounce box cake mix
9-by-13-inch cake pan
Large mixing bowl
One 16-ounce container ready-made frosting
Large metal spoon
Wax paper
2 baking sheets
Plastic wrap
32 ounces candy coating
Deep, microwave-safe plastic bowl
Toothpicks
Resealable plastic bag or squeeze bottle (optional)
Bake the cake as directed on the box, using a 9-by-13-inch cake pan. Let cool completely.
Once the cake is cooled, get organized and set aside plenty of time (at least an hour) to crumble, roll, and dip 4 dozen cake balls.
Crumble the cooled cake into a large mixing bowl. The texture of the cake causes it to crumble easily. Just cut a baked 9-by-13-inch cake into 4 equal sections. Remove a section from the pan, break it in half, and rub the two pieces together over a large bowl, making sure to crumble any large pieces that fall off. You can also use a fork to break any larger pieces of cake apart. Repeat with each section until the entire cake is crumbled into a fine texture. If you have large pieces mixed in, the cake balls may turn out lumpy and bumpy. You should not see any large pieces of cake.
Add three-quarters of the container of frosting. (You will not need the remaining frosting.) Mix it into the crumbled cake, using the back of a large metal spoon, until thoroughly combined. If you use the entire container, the cake balls will be too moist.
The mixture should be moist enough to roll into 1 1/2-inch balls and hold a round shape. After rolling the cake balls by hand, place them on a wax paper–covered baking sheet.
Insert sticks into cake balls, if using. Cover with plastic wrap and chill for several hours in the refrigerator, or place in the freezer for about 15 minutes. You want the balls to be firm but not frozen.
Place the candy coating in a deep, microwave-safe plastic bowl. These bowls make it easier to cover the cake balls completely with candy coating while holding the bowl without burning your fingers. Work with about 16 ounces of coating at a time.
Melt the candy coating, following the instructions on the package. Microwave on medium power for 30 seconds at a time, stirring with a spoon in between. You can also use a double boiler. Either way, make sure you do not overheat the coating.
Now you’re ready to coat. Take a few cake balls at a time out of the refrigerator or freezer to work with. If they’re in the freezer, transfer the rest of the balls to the refrigerator at this point, so they stay firm but do not freeze.
Dip one cake pop at a time into the bowl of candy coating. If you’re making cake balls, place one ball at a time into the bowl of candy coating. Spoon extra coating over any uncoated areas of the cake ball to make sure it is completely covered in candy coating. Then lift out the cake ball with your spoon. Avoid stirring it in the coating, because cake crumbs can fall off into the coating.
Holding the spoon over the bowl, tap the handle of the spoon several times on the edge of the bowl until the excess coating falls off and back into the bowl. This technique also creates a smooth surface on the outside of the cake ball.
Transfer the coated cake ball to another wax paper-covered baking sheet to dry. Let the coated cake ball slide right off the spoon. Some coating may pool around the base of the ball onto the wax paper. If so, simply take a toothpick and use it to draw a line around the base of the cake ball before the coating sets. Once the coating sets, you can break off any unwanted coating.
Repeat with the remaining cake balls and let dry completely.
If you have extra candy coating left over, pour it into a resealable plastic bag (and then snip off the corner) or into a squeeze bottle and drizzle it over the tops in a zigzag motion to decorate.
You can make the cake balls ahead of time and store them in an airtight container on the counter or in the refrigerator for several days.
Tips: The cake balls will be easier to roll if you wash and dry your hands periodically during the rolling process. Dry your hands completely each time, and make sure you don’t get water in the candy coating, as it can make it unusable.
Use a mini ice cream scoop to get uniform-size cake balls.
If you don’t need or want to make 48 cake balls, simply divide the cake in half for 24 cake balls or in quarters for 12 and freeze the remaining cake for later use. Remember to reduce the amount of frosting proportionally.
Yield: 48 cake pops
Witches’ Teeth
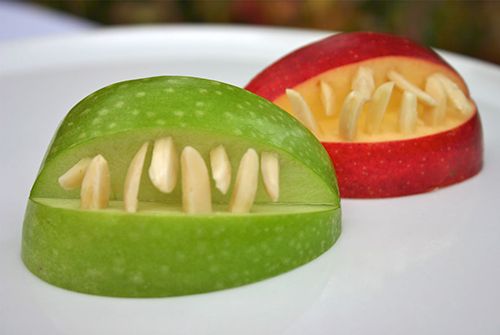
Quarter and core an apple. Remove a wedge from the skin side of the apple to form a mouth. Insert various shapes and sizes of slivered almonds for teeth. Spread peanut butter inside the mouths before inserting almonds for a ghoulish look.
Mini Pumpkin Cakes
These mini cakes from Karen Tack, author of the “Hello, Cupcake” and “What’s New Cupcake” books, come together easily. Use your own recipe for cake or frosting if you prefer. Here’s the recipe and decorating instructions from Family Circle magazine. Or, go online for a step-by-step video at www.familycircle.com/ pumpkincakes.
Mini Pumpkin Cakes
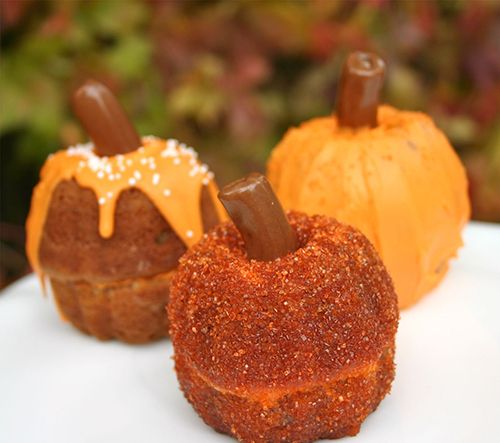
This recipe from Family Circle recipe suggests using candy bars to create the pumpkin stems. I had good luck with Tootsie Rolls, rolled out a bit on a wooden cutting board.
1 box (15.25 ounces) spice or devil’s food cake mix
3 large eggs
1/2 cup vegetable oil
1 cup buttermilk
1 can (16-ounces) vanilla or chocolate frosting
Orange paste food coloring (optional)
Honey wheat pretzel twists, Kit Kat bars or Twix bars for stems
1/3 cup corn syrup
Assorted colored sugars or sprinkles
For the cake: Heat oven to 350 degrees. Grease and flour two 12-cup mini Bundt cupcake pans (2 1/2 inches across top). Prepare cake mix according to package directions with eggs and oil, but using buttermilk in place of water. Spoon batter into prepared pans, filling halfway full (about 2 tablespoons batter in each).
Bake at 350 degrees for 15 to 20 minutes or until golden brown and a toothpick inserted into center comes out clean. Transfer to a wire rack; cool in pans for 5 minutes. Invert and cool completely. Use a small serrated knife to trim domed top from each cake to make it level.
Tint vanilla frosting orange, if desired. Spread a small amount of frosting on trimmed side of cake. Place another trimmed cake, cut side down on top of frosting to make a small pumpkin shape. Repeat to make 12 mini cakes.
To decorate: For frosted cakes, spread some of the frosting all over a mini cake to cover. Use a small spatula to spread frosting in ridges, starting from bottom to top. Add a trimmed candy bar piece on top as the stem.
For sugared cakes, microwave corn syrup for 3 to 5 seconds. Brush over an assembled cake, then roll cake in colored sugar to coat lightly. Add a candy or pretzel stem on top. For glazed cakes, microwave 1/4 cup of the frosting for about 5 to 7 seconds until smooth but not too thin. Spoon a little on top of a mini cake, allow it to drip down the side. Add sprinkles while frosting is still wet. Add a trimmed candy or pretzel piece on top as stem.
Yield: 12 cakes
Approximate nutrition per serving: 476 calories, 22 grams fat (5 grams saturated), 4 grams protein, 68 grams carbohydrate, 54 milligrams cholesterol, no dietary fiber, 360 milligrams sodium.
Mummy Sandwiches on a Stick
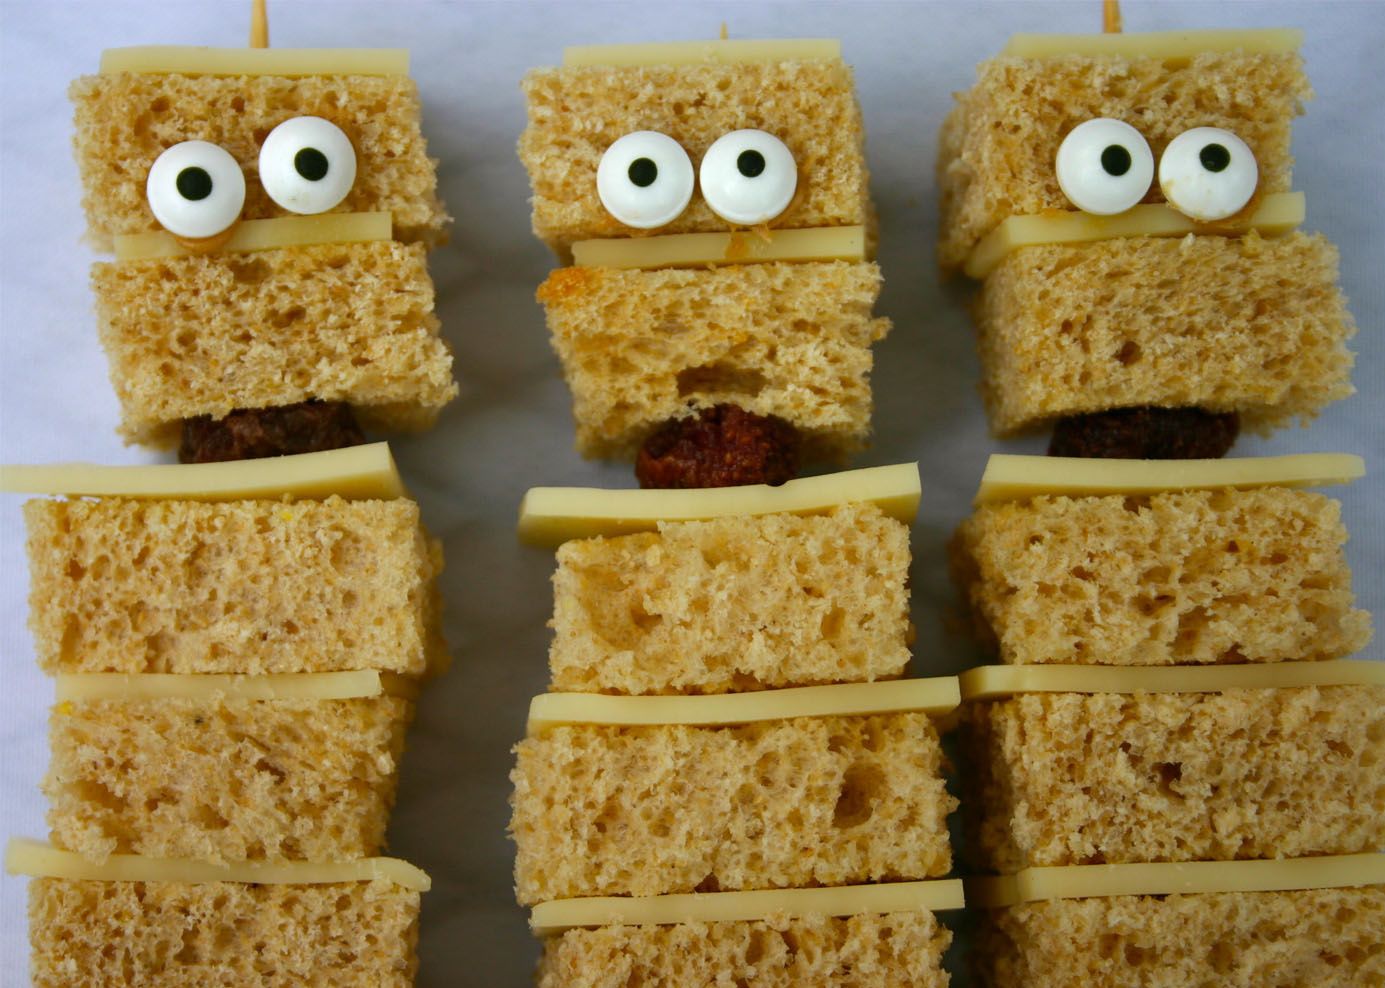
I came across the yummy mummies on a stick at the Bent on Better Lunches blog.
The author uses a sandwich cutter to make the perfect cubes of bread and cheese, alternating them on a skewer for lunches for her kids. (She cut the sharp ends of the skewer off before sending them to school). I had good luck using a knife to cut the bread and cheese. Use a Craisin or another dried fruit to separate the head from the body. Honey or peanut butter can be the “glue” for candy eyeballs to complete the look. Or, use mini chocolate chips for eyes. She also makes a mummy alternating peanut butter and bread pieces.
There are more details at www.bentonbetterlunches. com/2012/10/yummy- mummy-on-stick.html.
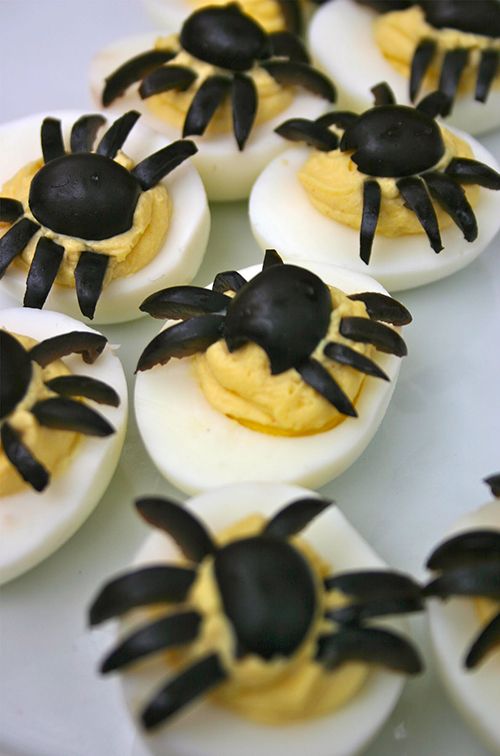
Spooky Spider Eggs
Cut pitted black olives in half lengthwise and nestle one half on top of a deviled egg for the body of a spider. Then cut the other half crosswise into thin pieces for legs.
Here’s a recipe for basic deviled eggs or use a family favorite.
Deviled Eggs
From epicurious.com
6 large eggs
1/4 cup mayonnaise
1 teaspoon Dijon mustard
1/8 teaspoon cayenne
Cover eggs with cold water by 1 1/2 inches in a 3-quart heavy saucepan and bring to a rolling boil, partially covered. Reduce heat to low and cook eggs, covered completely, 30 seconds. Remove from heat and let stand, covered, 15 minutes. Transfer eggs with a slotted spoon to a bowl of ice and cold water to stop cooking and let stand 5 minutes.
Peel eggs and halve lengthwise. Carefully remove yolks and mash in a bowl with a fork. Add mayonnaise, mustard, and cayenne and stir with fork until smooth, then season with salt and pepper. Fill pastry bag with yolk mixture and pipe into egg whites.
Yield: 6 appetizer servings